


Table of contents
Medusa is the leading open source Node.js ecommerce platform for JavaScript developers. It provides similar core functionality as Shopify out-of-the-box, while its open abstraction-based and headless architecture make customizations and maintenance much easier to handle for developers as businesses’ needs evolve.
Most of the heavy lifting job has been done by Medusa so that you can achieve a production-ready store in a short amount of time. Medusa’s abstract architecture also allows developers to extend and customize the platform to fit their use case hassle-free.
This article will take you through Medusa’s architecture and give you a general overview of the Medusa server to better understand how it works.
Medusa Architecture Overview
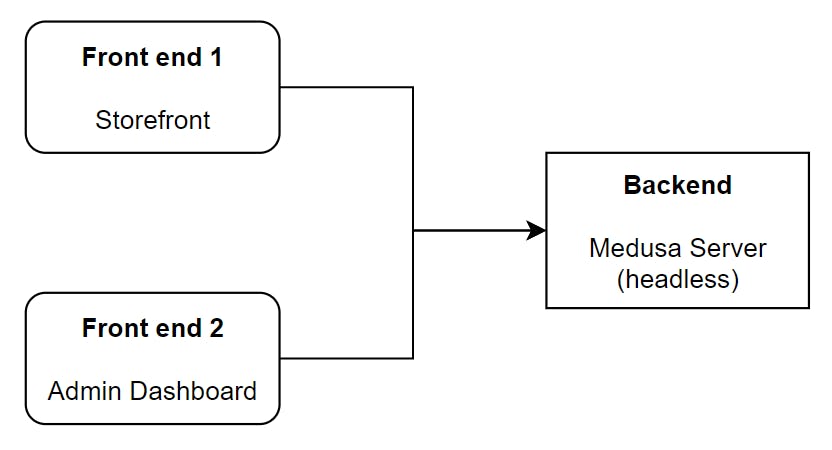
Three main components of a Medusa project
Medusa’s complete architecture consists of three main components: Headless Node.js Ecommerce Server, Admin Dashboard, and Storefront. The modular and headless architecture makes all three components completely separated and deployable to different environments without any restriction.
To understand more what each component is:
- Medusa Server (Headless)
- This is the core component and is the brain of your online store. It is a Node.js Ecommerce Server. Being a headless server, it is accessed via REST APIs. Both the storefront and admin dashboard are presentation layers to interact with the server.
- Everything you configure in the admin dashboard or actions performed by consumers on the storefront are handled underneath by the Medusa server.
- Admin Dashboard
- Only authorized personnel can access the admin dashboard. This is where you manage your online store’s data and settings such as adding products, setting price/currencies, and managing orders.
- Medusa provides an intuitive admin built with Gatsby, but you can also create your own from scratch using the REST APIs.
- Storefront
- A storefront is where consumers arrive, search for products and buy them. An example of a storefront is the Amazon website. You can either have one cross-platform storefront (e.g., web application), or multiple storefronts (e.g., web, iOS, and Android native applications).
- Medusa provides two starter storefronts, one built using Next.js and one using Gatsby. You can also build your own storefront by interacting with the REST APIs.
This article focuses only on the Medusa server, as it is the core of your Node.js ecommerce platform.
Development Environment
Medusa relies mainly on Node.js to be installed on your system. You need version 14 or higher.
Medusa also uses other technologies and tools such as PostgreSQL and Redis.
This article covers how and when these components are used in your Medusa server. You can follow along this documentation to learn how to install each of the environment requirements.
How to install the Medusa server?
To install the Medusa server, you need to use the Medusa CLI tool. You can install the Medusa CLI tool with the following command:
npm install -g @medusajs/medusa-cli
Then, install a Medusa server with the following command:
medusa new my-medusa-store --seed
Your server now resides in the my-medusa-store folder. The --seed option creates an SQLite database at the root of the project. The SQLite database holds dummy data for your server such as sample products, regions, and more. Seeded data is only for testing purposes in a development environment.
As using the SQLite database can present a lot of limitations in development and especially in production, it is recommended to install and set up a PostgreSQL database instead.
What is my-medusa-store made of?
If you have worked with NestJS or Angular before, the folder structure might seem familiar. Navigate to my-medusa-store, and you can see the content below.
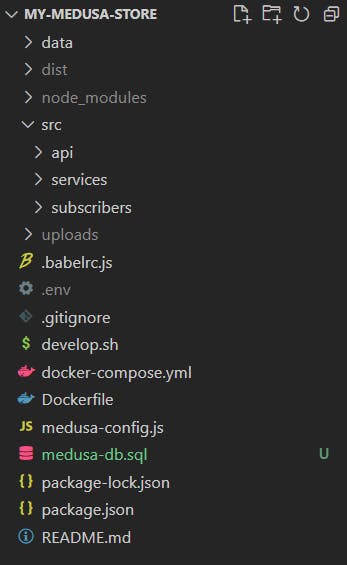
Inside my-medusa-store folder
For starters, the four main directories and files you want to focus on are data, dist, src, and medusa-config.js.
datadirectory contains fake data to populate your demo store either using the--seedoption or using the commandnpm run seed.medusa-config.jsfile is where you define project configuration, such as database information, service API keys, plugins, and more.srcfolder holds the implementation of your custom files, from custom endpoints (inapi) to global services (inservices) and event listeners (insubscribers). These three child folders are going to be discussed in the next few sections.distdirectory only appears after you runnpm run buildormedusa develop. It holds compiled files that are originally in thesrcdirectory. The compiled files will be used when you run the server.
For product image uploads you need to install and integrate file service plugins such as MinIO, Amazon S3, or DigitalOcean Spaces.
What is in the medusa-config.js file?
By default, the server contains the following variables.
ADMIN_CORS and STORE_CORS
The components are decoupled in Medusa. So, the Node.js ecommerce headless server, admin dashboard, and storefront can have different origins (e.g., different domains, or different ports on the same domain). This causes Avoid Cross-Origin Resource Sharing (CORS) and blocks communication between components.
The usage of CORS variables is a way to solve this issue. By default, the headless server runs on port 9000, the admin dashboard runs on port 7000 or 7001, and the storefront is available at port 8000. If you decide to change the origins of the front ends or deploy components to different environments, then the CORS values must be adjusted accordingly.
# .env
# CORS when consuming Medusa from admin
ADMIN_CORS=http://localhost:7000

# CORS to avoid issues when consuming Medusa from a client
STORE_CORS=http://localhost:8000
DATABASE_URL
This is a connection string to the PostgreSQL instance.
PostgreSQL is a mature open source relational database that has been adopted by developers around the world. With its performance, reliability, and strict data integrity, PostgreSQL can support your online store even on a global scale.
For connection string construction, please refer to PostgreSQL official documentation.
# .env
# Sample of typical PostgreSQL connection string format
# postgres://<DB_USER>:<PASSWORD>@<HOST>:<PORT_NUMBER>/<DB_NAME>
DATABASE_URL=postgres://adminuser:password123@localhost:5432/my-medusa-database
REDIS_URL
This is a connection string to the Redis instance.
Redis is a high-performant open source in-memory data structure. In Medusa, it is used as an event queue, so all events-related features need Redis to be properly configured. More about how Medusa uses Redis is explained later in this guide.
For connection string, please refer to this guide.
# .env
# Sample of typical Redis connection string format
# redis://<REDIS_USER>:<PASSWORD>@<HOST>:<PORT_NUMBER>/<INSTANCE_NAME>
REDIS_URL=redis://superuser:redispassword@localhost:6379/my-redis-instance
Plugins
In many ecommerce solutions, extending the functionalities often requires a dedicated team and server resources. However, Medusa solves this by letting you incorporate new features to the core server process via plugins; thereby eliminating additional resource requirements.
Since Medusa is a Node.js ecommerce platform, a plugin is basically an NPM package. After installation, put the name of your plugin (package) in the plugins variable and you are good to go. From here on out, the plugins can use all other Medusa services and even access the database.
const plugins = [
  `plugin-without-options`,
  {
    resolve: `plugin-with-options`,
    options: {
      api_key: YOUR_PLUGIN_API_KEY,
      ...
    },
  },
];
How to run the Medusa server?
Use the following command in the root of the Medusa server directory to run the server:
medusa develop
The server will run onlocalhost:9000. You can check the API reference for a list of endpoints you can use to interact with the server.
What is a custom endpoint in Medusa?
Let’s say you want to allow a business partner to access your inventory, what is the way to do so? Certainly, a protected API is the answer for you.
In the Medusa server, you can implement custom endpoints in the /src/api folder. As Express is used internally, in a sense, the Medusa instance can act as a general public Express server. There is no limit to the endpoints. Your endpoints can be organized into one, or multiple files.
By conventions, endpoints for admin are prefixed with admin, while endpoints for storefront are prefixed with store.
For example:
/**
 * /src/api/index.js
 */

import { Router } from "express"

export default () => {
  const router = Router()

  router.get("/admin/hello", (req, res) => {
    res.json({
      message: "Welcome to Your Store!",
    })
  })

  return router
}
Implementation of APIs requires a certain degree of Express knowledge and is not discussed in this article. To dive deeper into endpoints in Medusa, check out the documentation on how to add endpoints for Admin and Storefront.
What is a Service in Medusa?
Now that you know the Medusa server can create custom endpoints, let's revisit the B2B example:
You want to have a business partner accessing your inventory.
As stated, a protected API is required so only your partner can access the private inventory, and you know where the API is implemented, but where does the "private inventory access" feature reside?
Following the SOLID principle where an S represents single responsibility, files in /src/api are controllers responsible for managing HTTP requests/responses and deciding what portion of the code should be called upon.
On the other hand, private inventory access is considered a service. Services in Medusa reside in /src/services. They represent one specific entity and functionalities related to it.
An example of service:
/**
 * /src/services/privateInventoryAccess.js
 */

import { BaseService } from "medusa-interfaces"

class PrivateInventoryAccessService extends BaseService {
  getUnreleasedProducts() {
    ...
  }
}

export default PrivateInventoryAccessService
Services can be accessed anywhere on your Medusa server. For example, to use PrivateInventoryAccessService in an endpoint:
/**
 * /src/api/index.js
 */

// File name of service is "privateInventoryAccess.js", so its registration name
//  is a camel-cased version: "privateInventoryAccessService"
// The service is accessible via req.scope.resolve(serviceRegistrationName)
const privateInventoryAccessService = req.scope.resolve("privateInventoryAccessService")

res.json({
  unreleasedProducts: privateInventoryAccessService.getUnreleasedProducts(),
})
For a complete tutorial on service creation, you can start with official Medusa documentation.
What is a Subscriber in Medusa?
Medusa handles some specific but fundamental actions of a Node.js ecommerce platform such as order placement or user password reset. When an action happens, a respective event is emitted (for example, order placement emits an order.placed event).
A subscriber is responsible for listening to these events and handling them. Internally, events rely on the Redis event queue. Events are pushed to this queue, then Redis will emit these events to the subscribers that are listening to them.
Without Redis being installed and configured, events are not emitted and subscribers will not work. You can download Redis at their official website.
You can achieve highly customizable workflows using subscribers. Many plugins such as SendGrid or Mailchimp use subscribers internally, and you can use them as a plug-and-play workflow extension.
You can check out the full list of events in Medusa’s documentation.
Customized subscribers reside in /src/subscribers. Here’s an example of a subscriber:
/**
 * /src/subscribers/orderPlacementLogger.js
 */

class OrderPlacementLoggerSubscriber {
  constructor({ eventBusService }) {
    eventBusService.subscribe("order.placed", this.writeLog);
  }

  writeLog = async (data) => {
    console.log(...)
  };
}

export default OrderPlacementLoggerSubscriber;
For a complete tutorial on subscribers and how they work check out Medusa’s documentation.
Next Steps
This article should help you have a grasp of the Medusa server fundamentals. However, there’s still much more that you can do with Medusa.
Here are some additional resources to check out:
- Learn about Medusa’s shipping architecture and how to create a fulfillment provider.
- Learn about Medusa’s payment architecture and how to create a payment provider.
- Learn how to add plugins such as Segment, Stripe, or MeiliSearch.
- Learn how to deploy Medusa on Heroku.
Don't forget to join Medusa's Discord as the team is there to help if you have any questions.