In part 1 of the B2B series, you learned how to set up your Medusa server for a B2B ecommerce use case. You set up a B2B Sales Channel, Customer Groups, and Price List. You also added an endpoint that checks whether a customer is a B2B customer or not.
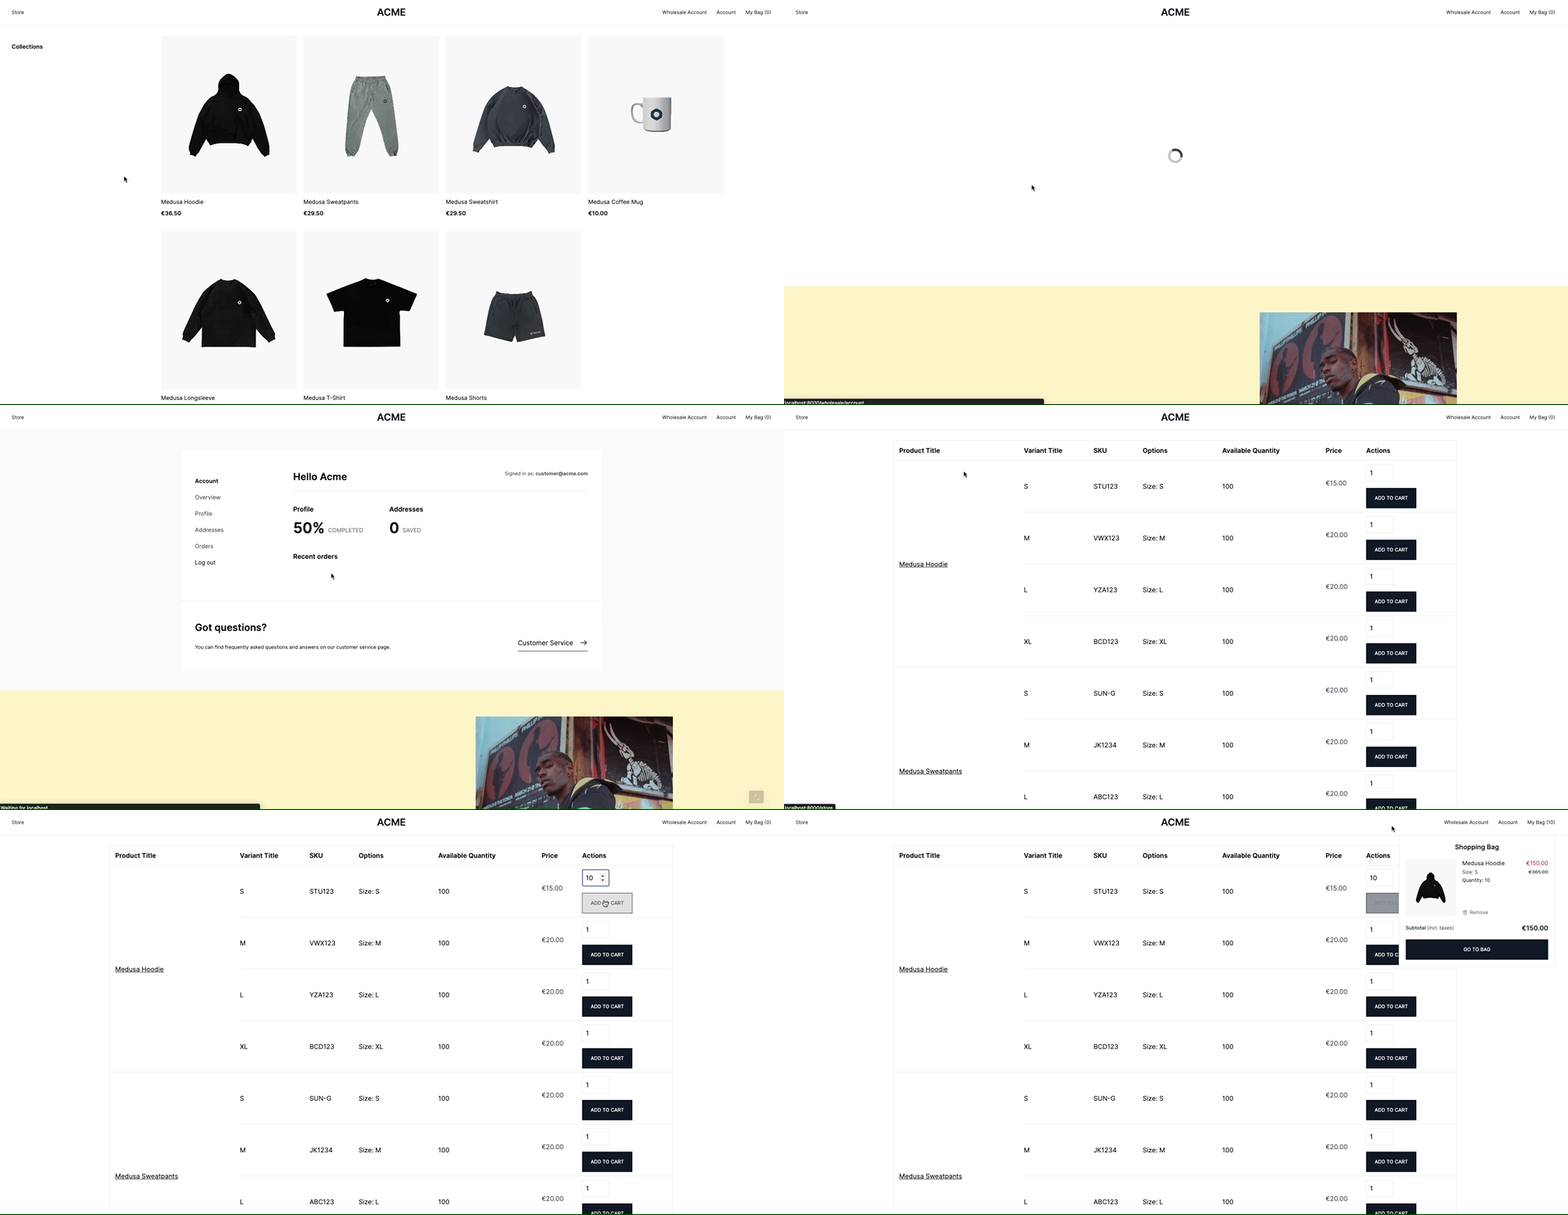
In this part of the series, you’ll customize Medusa’s Next.js storefront to add a Wholesaler login screen and a different way of displaying products for B2B customers. You’ll also explore how the checkout flow works for B2B customers.
You can find the full code for this tutorial series in this GitHub repository.
Install Next.js Storefront
In your terminal, run the following command to install the Next.js Storefront:
npx create-next-app -e https://github.com/medusajs/nextjs-starter-medusa b2b-storefront
This installs the Next.js storefront in a newly created directory b2b-storefront.
Then, change to the b2b-storefront directory and rename the .env.template file:
cd b2b-storefront
mv .env.template .env.local
Install Dependencies
To ensure you’re using the latest version of Medusa dependencies, run the following command to update Medusa dependencies:
npm install @medusajs/medusa@latest @medusajs/medusa-js@latest medusa-react@latest
In addition, install axios to send requests to the custom endpoint you created in the previous tutorial:
npm install axios
Add Sales Channel Environment Variable
You’ll be using the Sales Channel you created in the first part to retrieve B2B products for B2B customers and to set the correct Sales Channel for B2B customers’ carts.
So, you need to set the ID of the sales channel in an environment variable.
If you’re unsure what the ID of the sales channel is, you can send a request to the List Sales Channel admin endpoint. You should find a Sales Channel with the name “B2B”. Copy the ID of that Sales Channel.
Then, add the following environment variable in .env.local:
NEXT_PUBLIC_SALES_CHANNEL_ID=<YOUR_SALES_CHANNEL_ID>
Where <YOUR_SALES_CHANNEL_ID> is the ID of the B2B Sales Channel.
Create a Wholesale Login Page
In this section, you’ll add a login page specific to B2B customers. This requires adding some new pages and files, but also customizing existing logic.
Change AccountContext
The Next.js storefront defines an AccountContext that allows you to get access to customer-related data and functionalities across your storefront. You need to make changes to it to add a new variable to the context: is_b2b. This variable will allow you to check whether the customer is a B2B customer or not throughout the storefront.
In src/lib/context/account-context.tsx, add the is_b2b attribute to the AccountContext interface:
interface AccountContext {
  //...
  is_b2b: boolean
}
Then, at the beginning of the AccountProvider function, add a new state variable is_b2b:
export const AccountProvider = ({ children }: AccountProviderProps) => {
  const [is_b2b, setIsB2b] = useState(false)
    //...
}
Next, add a new callback function checkB2b inside the AccountProvider function:
import axios from "axios"
import { useRouter } from "next/router"
import { MEDUSA_BACKEND_URL, medusaClient } from "@lib/config"
//...

export const AccountProvider = ({ children }: AccountProviderProps) => {
    //...
    const checkB2b = useCallback(async () => {
    if (customer) {
      //check if the customer is a b2b customer
      const { data } = await axios.get(`${MEDUSA_BACKEND_URL}/store/customers/is-b2b`, {
        withCredentials: true
      })
      setIsB2b(data.is_b2b)
    } else {
      setIsB2b(false)
    }
  }, [customer])

    useEffect(() => {
    checkB2b()
  }, [checkB2b])
    //...
}
This function sends a request to the /store/customers/is-b2b endpoint that you created in part 1. It then changes the value of the is_b2b state variable based on the response received.
You also run this callback function in useEffect which triggers the function whenever there’s a change in the callback. In other words, whenever the customer is changed.
You also need to set the value of is_b2b back to false when the customer logs out. You can add that in the handleLogout function in AccountProvider:
const handleLogout = () => {
    useDeleteSession.mutate(undefined, {
      onSuccess: () => {
        //...
        setIsB2b(false)
      },
    })
  }
Lastly, pass is_b2b in the value prop of AccountContext.Provider:
return (
    <AccountContext.Provider
      value={{
        //...
        is_b2b
      }}
    >
      {children}
    </AccountContext.Provider>
  )
These are all the changes necessary to enable checking whether the customer is a B2B customer or not throughout the storefront.
There’s also one last change to make that enhances the customer experience. Change the checkSession function in AccountProvider to the following:
const checkSession = useCallback(() => {
  if (!customer && !retrievingCustomer) {
    router.push(router.pathname.includes("wholesale") ? "/wholesale/account/login" : "/account/login")
  }
}, [customer, retrievingCustomer, router])
Previously, the function redirects the customer to /account/login if they were trying to access account pages. To ensure that a guest customer gets redirected to the wholesaler login page when they try to access a wholesale page, you add a condition that determines where the guest customer should be redirected.
Change StoreContext
The Next.js storefront also defines a StoreContext that manages the store’s regions, cart, and more.
In this section, you’ll make changes to the StoreContext to ensure the correct sales channel is assigned to B2B customers’ carts.
In src/lib/context/store-context.tsx, change the createNewCart function in the StoreProvider function to the following:
import { MEDUSA_BACKEND_URL, medusaClient } from "@lib/config"
import axios from "axios"
import React, { createContext, useCallback, useContext, useEffect, useState } from "react"
//...

export const StoreProvider = ({ children }: StoreProps) => {
    //...
    const createNewCart = async (regionId?: string) => {
    const cartData: {
      region_id?: string,
      sales_channel_id?: string
    } = { region_id: regionId }

    if (process.env.NEXT_PUBLIC_SALES_CHANNEL_ID) {
      //check if customer is b2b
      const { data } = await axios.get(`${MEDUSA_BACKEND_URL}/store/customers/is-b2b`, {
        withCredentials: true
      })

      if (data.is_b2b) {
        cartData.sales_channel_id = process.env.NEXT_PUBLIC_SALES_CHANNEL_ID
      }
    }

    await createCart.mutateAsync(
      cartData,
      {
        onSuccess: ({ cart }) => {
          setCart(cart)
          storeCart(cart.id)
          ensureRegion(cart.region)
        },
        onError: (error) => {
          if (process.env.NODE_ENV === "development") {
            console.error(error)
          }
        },
      }
    )
  }
    //...
}
Previously, this function only passed the region ID to the createCart mutation. By making the above change you check first if the customer is a B2B customer and add the sales_channel_id field to the data to be passed to the createCart mutation.
Next, change the resetCart function in the StoreProvider function to the following:
export const StoreProvider = ({ children }: StoreProps) => {
    //...
    const resetCart = async () => {
    deleteCart()

    const savedRegion = getRegion()

    const cartData: {
      region_id?: string,
      sales_channel_id?: string
    } = { region_id: savedRegion?.regionId }

    if (process.env.NEXT_PUBLIC_SALES_CHANNEL_ID) {
      //check if customer is b2b
      const { data } = await axios.get(`${MEDUSA_BACKEND_URL}/store/customers/is-b2b`, {
        withCredentials: true
      })

      if (data.is_b2b) {
        cartData.sales_channel_id = process.env.NEXT_PUBLIC_SALES_CHANNEL_ID
      }
    }

    createCart.mutate(
      cartData,
      {
        onSuccess: ({ cart }) => {
          setCart(cart)
          storeCart(cart.id)
          ensureRegion(cart.region)
        },
        onError: (error) => {
          if (process.env.NODE_ENV === "development") {
            console.error(error)
          }
        },
      }
    )
  }
    //...
}
This change is similar to the previous change. It ensures that the correct sales channel ID is assigned to the cart when it’s reset.
Finally, change the ensureCart function inside useEffect to the following:
useEffect(() => {
    const ensureCart = async () => {
      const cartId = getCart()
      const region = getRegion()

      if (cartId) {
        const cartRes = await medusaClient.carts
          .retrieve(cartId)
          .then(async ({ cart }) => {
            if (process.env.NEXT_PUBLIC_SALES_CHANNEL_ID && cart.sales_channel_id !== process.env.NEXT_PUBLIC_SALES_CHANNEL_ID) {
              //check if b2b customer
              const { data } = await axios.get(`${MEDUSA_BACKEND_URL}/store/customers/is-b2b`, {
                withCredentials: true
              })
              if (data.is_b2b) {
                //update cart's sales channel
                const response = await medusaClient.carts.update(cart.id, {
                  sales_channel_id: process.env.NEXT_PUBLIC_SALES_CHANNEL_ID
                })

                return response.cart
              }
            }
            return cart
          })
          .catch(async (_) => {
            return null
          })

        if (!cartRes || cartRes.completed_at) {
          deleteCart()
          await createNewCart(region?.regionId)
          return
        }

        setCart(cartRes)
        ensureRegion(cartRes.region)
      } else {
        await createNewCart(region?.regionId)
      }
    }

    if (!IS_SERVER && !cart?.id) {
      ensureCart()
    }
    // eslint-disable-next-line react-hooks/exhaustive-deps
  }, [])
Similar to the previous changes, this ensures that when the storefront is opened and the cart is retrieved, the correct sales channel is assigned to the cart.
Change the Nav Component
To ensure customers can access the wholesale login page, you’ll add a new link to the navigation bar.
In src/modules/layout/templates/nav/index.tsx add the following in the returned JSX above the Account link:
<Link href="/wholesale/account">
    <a>Wholesale Account</a>
</Link>
<Link href="/account">
  <a>Account</a>
</Link>
Add Login Form Component
The login page should display a login form for the customer.
To create the login form, create the file src/modules/wholesale/components/login/index.tsx with the following content:
import { FieldValues, useForm } from "react-hook-form"
import { MEDUSA_BACKEND_URL, medusaClient } from "@lib/config"

import Button from "@modules/common/components/button"
import Input from "@modules/common/components/input"
import axios from "axios"
import { useAccount } from "@lib/context/account-context"
import { useCart } from "medusa-react"
import { useRouter } from "next/router"
import { useState } from "react"

interface SignInCredentials extends FieldValues {
  email: string
  password: string
}

const Login = () => {
  const { refetchCustomer, is_b2b } = useAccount()
  const [authError, setAuthError] = useState<string | undefined>(undefined)
  const router = useRouter()
  const { cart, updateCart } = useCart()

  const handleError = (_e: Error) => {
    setAuthError("Invalid email or password")
  }

  const {
    register,
    handleSubmit,
    formState: { errors },
  } = useForm<SignInCredentials>()

  const onSubmit = handleSubmit(async (credentials) => {
    medusaClient.auth
      .authenticate(credentials)
      .then(async () => {
        refetchCustomer()
        if (process.env.NEXT_PUBLIC_SALES_CHANNEL_ID && cart?.sales_channel_id !== process.env.NEXT_PUBLIC_SALES_CHANNEL_ID) {
          const { data } = await axios.get(`${MEDUSA_BACKEND_URL}/store/customers/is-b2b`, {
            withCredentials: true
          })
          if (data.is_b2b) {
            updateCart.mutate({
              sales_channel_id: process.env.NEXT_PUBLIC_SALES_CHANNEL_ID
            })
          }
        }
        router.push(is_b2b ? "/wholesale/account" : "/account")
      })
      .catch(handleError)
  })

  return (
    <div className="max-w-sm w-full flex flex-col items-center">
      <h1 className="text-large-semi uppercase mb-6">Welcome back</h1>
      <p className="text-center text-base-regular text-gray-700 mb-8">
        Sign in to your wholesale account
      </p>
      <form className="w-full" onSubmit={onSubmit}>
        <div className="flex flex-col w-full gap-y-2">
          <Input
            label="Email"
            {...register("email", { required: "Email is required" })}
            autoComplete="email"
            errors={errors}
          />
          <Input
            label="Password"
            {...register("password", { required: "Password is required" })}
            type="password"
            autoComplete="current-password"
            errors={errors}
          />
        </div>
        {authError && (
          <div>
            <span className="text-rose-500 w-full text-small-regular">
              These credentials do not match our records
            </span>
          </div>
        )}
        <Button className="mt-6">Enter</Button>
      </form>
    </div>
  )
}

export default Login
This login form shows the customer the fields email and password. When the customer submits the form and they’re authenticated successfully, you check if the customer is a B2B customer and accordingly update the cart’s sales channel ID.
This is important as products can only be added to a cart that belongs to the same sales channel.
Add Login Template Component
The login template component will be displayed on the Login page.
Create the file src/modules/wholesale/templates/login-template.tsx with the following content:
import Login from "../components/login"
import { useAccount } from "@lib/context/account-context"
import { useEffect } from "react"
import { useRouter } from "next/router"

const WholesaleLoginTemplate = () => {
  const { customer, retrievingCustomer, is_b2b } = useAccount()

  const router = useRouter()

  useEffect(() => {
    if (!retrievingCustomer && customer ) {
      router.push(is_b2b ? "/wholesale/account" : "/account")
    }
  }, [customer, retrievingCustomer, router, is_b2b])

  return (
    <div className="w-full flex justify-center py-24">
      <Login />
    </div>
  )
}

export default WholesaleLoginTemplate
In this template, you first check if the customer is already logged in and redirect them to their account page based on whether they’re a B2B customer or not.
If the customer is not logged in, you show the Login form component.
Add Login Page
Create the file src/pages/wholesale/account/login.tsx with the following content:
import Head from "@modules/common/components/head"
import Layout from "@modules/layout/templates"
import LoginTemplate from "@modules/wholesale/templates/login-template"
import { NextPageWithLayout } from "types/global"

const Login: NextPageWithLayout = () => {
  return (
    <>
      <Head title="Sign in" description="Sign in to your Wholesale account." />
      <LoginTemplate />
    </>
  )
}

Login.getLayout = (page) => {
  return <Layout>{page}</Layout>
}

export default Login
This is the login page that the customer sees when they access the /wholesale/account/login path. It shows the LoginTemplate component.
Add Wholesale Account Page
The last part you’ll add to finish the Wholesale login functionality is the account page for wholesalers. This page is shown when the B2B customer is logged in.
Create the file src/pages/wholesale/account/index.tsx with the following content:
import AccountLayout from "@modules/account/templates/account-layout"
import Head from "@modules/common/components/head"
import Layout from "@modules/layout/templates"
import { NextPageWithLayout } from "types/global"
import OverviewTemplate from "@modules/account/templates/overview-template"
import { ReactElement } from "react"
import { useAccount } from "@lib/context/account-context"
import { useRouter } from "next/router"

const Account: NextPageWithLayout = () => {
  const { customer, is_b2b } = useAccount()
  const router = useRouter()

  if (customer && !is_b2b) {
    router.push("/account")
  }

  return (
    <>
      <Head title="Wholesale Account" description="Overview of your account activity." />
      <OverviewTemplate />
    </>
  )
}

Account.getLayout = (page: ReactElement) => {
  return (
    <Layout>
      <AccountLayout>{page}</AccountLayout>
    </Layout>
  )
}

export default Account
In this page, you first check whether the customer is logged in but they’re not a B2B customer. In that case, you redirect them to the /account page which is used by other types of customers.
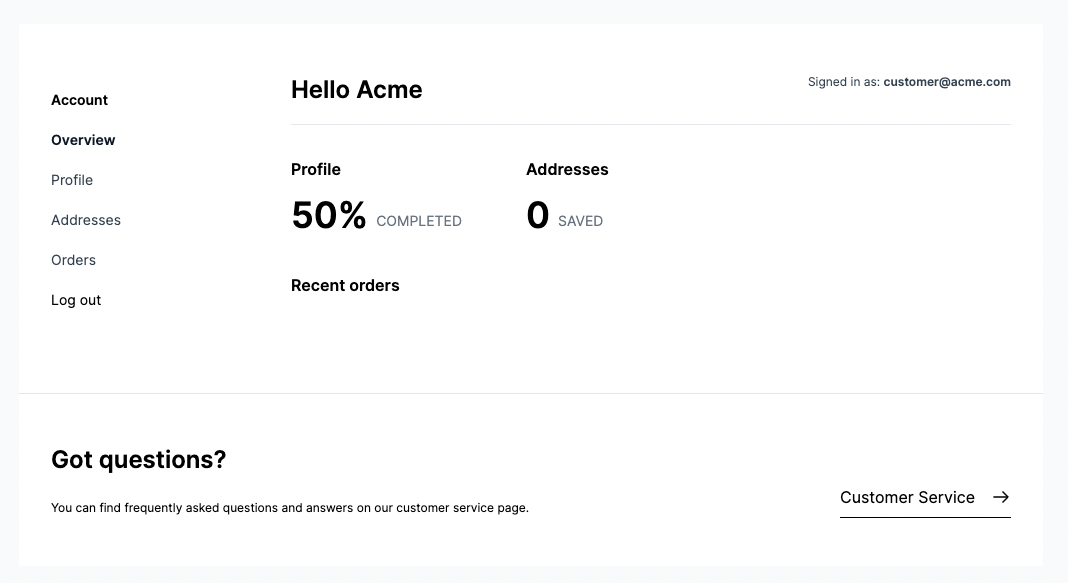
On this page, you show the same OverviewTemplate that is shown by default for customers. This is for the simplicity of the tutorial. If you want to display other information to B2B customers, you can make the changes on this page.
Test Wholesale Login
Make sure the Medusa server you created in part 1 is running. Then, run the following command to run the Next.js storefront:
npm run dev
Open the storefront at localhost:8000 and click on the Wholesale Account link in the navigation bar. This will open the login page you created.
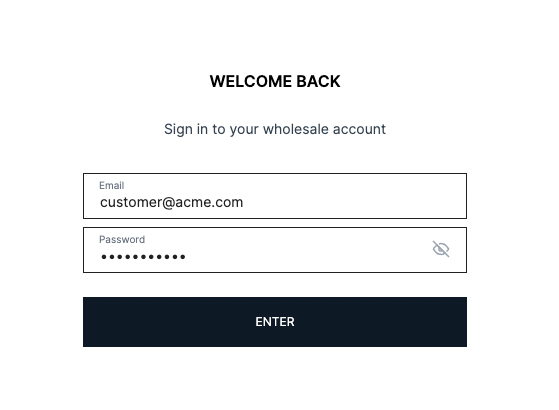
In part 1 you created a customer in a B2B customer group. Use the email and password of that customer to log in.
Once you’re logged in, you’ll be redirected to the /wholesale/account page.
Create B2B Products Page
In this section, you’ll customize the current product page (available on the page /store) to show products as a list of variants in a table. This makes it easier for B2B customers to view available products and their variants and add big quantities of them to the cart.
Change ProductContext
Another context that the Next.js storefront defines is the ProductContext which manages a product’s options, price, variants, and more.
You’ll be customizing this context to expose in the context the setQuantity function that allows setting the quantity to be added to the cart.
In src/lib/context/product-context.tsx, add in the ProductContext interface the setQuantity function:
interface ProductContext {
  //...
  setQuantity: (quantity: number) => void
}
Then, add the function to the object passed to the ProductActionContext.Provider's value prop:
return (
    <ProductActionContext.Provider
      value={{
        //...
        setQuantity
      }}
    >
      {children}
    </ProductActionContext.Provider>
  )
Please note that the function is already defined in the context with the quantity state variable.
Create ProductActions Component
The ProductActions component is a component that displays a button and a quantity input and handles the add-to-cart functionality. It’ll be displayed for each variant in the products table.
Create the file src/modules/wholesale/components/product-actions/index.tsx with the following content:
import { Product, Variant } from "types/medusa"
import React, { useEffect, useMemo, useState } from "react"

import Button from "@modules/common/components/button"
import { isEqual } from "lodash"
import { useProductActions } from "@lib/context/product-context"

type ProductActionsProps = {
  product: Product
  selectedVariant: Variant
}

const ProductActions: React.FC<ProductActionsProps> = ({ product, selectedVariant }) => {
  const { updateOptions, addToCart, inStock, options, quantity, setQuantity } =
    useProductActions()

  useEffect(() => {
    const tempOptions: Record<string, string> = {}
    for (const option of selectedVariant.options) {
      tempOptions[option.option_id] = option.value
    }

    if (!isEqual(tempOptions, options)) {
      updateOptions(tempOptions)
    }
  }, [selectedVariant.options, options])

  return (
    <div className="flex flex-col gap-y-2">
      <input type="number" min="1" max={selectedVariant.inventory_quantity} value={quantity} disabled={!inStock}
        onChange={(e) => setQuantity(parseInt(e.target.value))} className="border p-2 w-max mt-2" />
      <Button onClick={addToCart} className="w-max my-2">
        {!inStock ? "Out of stock" : "Add to cart"}
      </Button>
    </div>
  )
}

export default ProductActions
This component uses the useProductActions hook which exposes the values in the ProductContext. In useEffect, it preselects the options in the current variant.
It displays a quantity input and an add-to-cart button. Both the value of the quantity input and the add-to-cart handler are managed by ProductContext.
Create ProductPrice Component
The ProductPrice component handles showing the correct variant price to the customer. It’ll be used to show the price of variants in the products table.
Create the file src/modules/wholesale/components/product-price/index.tsx with the following content:
import { Product } from "@medusajs/medusa"
import { Variant } from "types/medusa"
import clsx from "clsx"
import { useMemo } from "react"
import useProductPrice from "@lib/hooks/use-product-price"

type ProductPriceProps = {
  product: Product
  variant: Variant
}

const ProductPrice: React.FC<ProductPriceProps> = ({ product, variant }) => {

  const price = useProductPrice({ id: product.id, variantId: variant?.id })

  const selectedPrice = useMemo(() => {
    const { variantPrice, cheapestPrice } = price

    return variantPrice || cheapestPrice || null
  }, [price])

  return (
    <div className="mb-4">
      {selectedPrice ? (
        <div className="flex flex-col text-gray-700">
          <span>
            {selectedPrice.calculated_price}
          </span>
        </div>
      ) : (
        <div></div>
      )}
    </div>
  )
}

export default ProductPrice
This component uses the useProductPrice hook which makes it easier to manage the price of a variant, then display the price to the customer.
Create Products Component
The Products component is the products table that will be shown to the B2B customer.
Create the file src/modules/wholesale/components/products/index.tsx with the following content:
import { ProductProvider, useProductActions } from "@lib/context/product-context"
import { useCart, useProducts } from "medusa-react"
import { useMemo, useState } from "react"

import Button from "@modules/common/components/button"
import Link from "next/link"
import ProductActions from "../product-actions"
import ProductPrice from "../product-price"
import { StoreGetProductsParams } from "@medusajs/medusa"

type GetProductParams = StoreGetProductsParams & {
  sales_channel_id?: string[]
}

type ProductsType = {
  params: GetProductParams
}

const Products = ({ params }: ProductsType) => {
  const { cart } = useCart()
  const [offset, setOffset] = useState(0)
  const [currentPage, setCurrentPage] = useState(1)

  const queryParams = useMemo(() => {
    const p: GetProductParams = {}

    if (cart?.id) {
      p.cart_id = cart.id
    }

    p.is_giftcard = false
    p.offset = offset

    return {
      ...p,
      ...params,
    }
  }, [cart?.id, params, offset])

  const { products, isLoading, count, limit } = useProducts(queryParams, {
    enabled: !!cart
  })

  function previousPage () {
    if (!limit || !count) {
      return
    }
    const newOffset = Math.max(0, offset - limit)
    setOffset(newOffset)
    setCurrentPage(currentPage - 1)
  }

  function nextPage () {
    if (!limit || !count) {
      return
    }
    const newOffset = Math.min(count, offset + limit)
    setOffset(newOffset)
    setCurrentPage(currentPage + 1)
  }

  return (
    <div className="flex-1 content-container">
      {!isLoading && products && (
        <>
          <table className="table-auto w-full border-collapse border">
            <thead>
              <tr className="text-left border-collapse border">
                <th className="p-3">Product Title</th>
                <th>Variant Title</th>
                <th>SKU</th>
                <th>Options</th>
                <th>Available Quantity</th>
                <th>Price</th>
                <th>Actions</th>
              </tr>
            </thead>
            <tbody>
              {products.map((product) => (
                  <>
                    <tr>
                      <td className="p-3" rowSpan={product.variants.length + 1}>
                          <Link href={`/products/${product.handle}`} passHref={true}>
                            <a className="underline">{product.title}</a>
                          </Link>
                        </td>
                    </tr>
                    {product.variants.map((variant) => (
                      <ProductProvider product={product} key={variant.id}>
                         <tr className="border-collapse border">
                          <td>{variant.title}</td>
                          <td>{variant.sku}</td>
                          <td>
                            <ul>
                              {variant.options.map((option) => (
                                <li key={option.id}>
                                  {product.options.find((op) => op.id === option.option_id)?.title}: {option.value}
                                </li>
                              ))}
                            </ul>
                          </td>
                          <td>{variant.inventory_quantity}</td>
                          <td><ProductPrice product={product} variant={variant} /></td>
                          <td>
                            <ProductActions product={product} selectedVariant={variant} />
                          </td>
                         </tr>
                      </ProductProvider>
                    ))}
                  </>
              ))}
            </tbody>
          </table>
          <div className="my-2 flex justify-center items-center">
            <Button onClick={previousPage} disabled={currentPage <= 1} className="w-max inline-flex">
              Prev
            </Button>
            <span className="mx-4">{currentPage}</span>
            <Button onClick={nextPage} disabled={count !== undefined && limit !== undefined && (count / (offset + limit)) <= 1} className="w-max inline-flex">
              Next
            </Button>
          </div>
        </>
      )}
    </div>
  )
}

export default Products
This component retrieves the products in the B2B Sales Channel and displays them in a table. It also shows pagination controls to move between different pages.
For each product, you loop over its variants and display them one by one in different rows. For each variant, you use the ProductActions and the ProductPrice components you created to show the quantity input, the add to cart button, and the variant’s price.
Change Store Page
Currently, the store page displays products in an infinite-scroll mode for all customers. You’ll change it to display the Products table for B2B customers, and the infinite-scroll mode for other customers.
Change the content of src/pages/store.tsx to the following:
import Head from "@modules/common/components/head"
import InfiniteProducts from "@modules/products/components/infinite-products"
import Layout from "@modules/layout/templates"
import { NextPageWithLayout } from "types/global"
import Products from "@modules/wholesale/components/products"
import RefinementList from "@modules/store/components/refinement-list"
import { StoreGetProductsParams } from "@medusajs/medusa"
import { useAccount } from "@lib/context/account-context"
import { useState } from "react"

const Store: NextPageWithLayout = () => {
  const [params, setParams] = useState<StoreGetProductsParams>({})
  const { is_b2b } = useAccount()

  return (
    <>
      {!is_b2b && (
        <>
          <Head title="Store" description="Explore all of our products." />
          <div className="flex flex-col small:flex-row small:items-start py-6">
            <RefinementList refinementList={params} setRefinementList={setParams} />
            <InfiniteProducts params={params} />
          </div>
        </>
      )}
      {is_b2b && (
        <>
          <Head title="Wholesale Products" description="Explore all of our products." />
          <div className="flex flex-col small:flex-row small:items-start py-6">
            <Products params={{
              ...params,
              sales_channel_id: [process.env.NEXT_PUBLIC_SALES_CHANNEL_ID || ""]
            }} />
          </div>
        </>
      )}
    </>
  )
}

Store.getLayout = (page) => <Layout>{page}</Layout>

export default Store
You first retrieve is_b2b from useAccount. Then, if is_b2b is false, you display the InfiniteProducts component. Otherwise, for B2B customers, you display the Products component that you created.
Change Store Dropdown
When you hover over the Store link in the navigation bar, it currently shows a dropdown with some products and collections. As this is distracting for B2B customers, you’ll remove it for them.
In src/modules/layout/components/dropdown-menu/index.tsx, retrieve the is_b2b variable from the AccountContext:
import { useAccount } from "@lib/context/account-context"
//...

const DropdownMenu = () => {
    const { is_b2b } = useAccount()
    //...
}
And change the returned JSX to the following:
const DropdownMenu = () => {
    //...
    return (
    <>
      {is_b2b && (
        <div className="h-full flex">
          <Link href="/store" passHref>
            <a className="relative flex h-full">
              <span className="relative h-full flex items-center transition-all ease-out duration-200">
                Store
              </span>
            </a>
          </Link>
        </div>
      )}
      {!is_b2b && (
        <div
        onMouseEnter={() => setOpen(true)}
        onMouseLeave={() => setOpen(false)}
        className="h-full"
      >
        <div className="flex items-center h-full">
          <Popover className="h-full flex">
            <>
              <Link href="/shop" passHref>
                <a className="relative flex h-full">
                  <Popover.Button
                    className={clsx(
                      "relative h-full flex items-center transition-all ease-out duration-200"
                    )}
                    onClick={() => push("/store")}
                  >
                    Store
                  </Popover.Button>
                </a>
              </Link>

              <Transition
                show={open}
                as={React.Fragment}
                enter="transition ease-out duration-200"
                enterFrom="opacity-0"
                enterTo="opacity-100"
                leave="transition ease-in duration-150"
                leaveFrom="opacity-100"
                leaveTo="opacity-0"
              >
                <Popover.Panel
                  static
                  className="absolute top-full inset-x-0 text-sm text-gray-700 z-30 border-y border-gray-200"
                >
                  <div className="relative bg-white py-8">
                    <div className="flex items-start content-container">
                      <div className="flex flex-col flex-1 max-w-[30%]">
                        <h3 className="text-base-semi text-gray-900 mb-4">
                          Collections
                        </h3>
                        <div className="flex items-start">
                          {collections &&
                            chunk(collections, 6).map((chunk, index) => {
                              return (
                                <ul
                                  key={index}
                                  className="min-w-[152px] max-w-[200px] pr-4"
                                >
                                  {chunk.map((collection) => {
                                    return (
                                      <div key={collection.id} className="pb-3">
                                        <Link
                                          href={`/collections/${collection.id}`}
                                        >
                                          <a onClick={() => setOpen(false)}>
                                            {collection.title}
                                          </a>
                                        </Link>
                                      </div>
                                    )
                                  })}
                                </ul>
                              )
                            })}
                          {loadingCollections &&
                            repeat(6).map((index) => (
                              <div
                                key={index}
                                className="w-12 h-4 bg-gray-100 animate-pulse"
                              />
                            ))}
                        </div>
                      </div>
                      <div className="flex-1">
                        <div className="grid grid-cols-3 gap-4">
                          {products?.slice(0, 3).map((product) => (
                            <ProductPreview {...product} key={product.id} />
                          ))}
                          {loadingProducts &&
                            repeat(3).map((index) => (
                              <SkeletonProductPreview key={index} />
                            ))}
                        </div>
                      </div>
                    </div>
                  </div>
                </Popover.Panel>
              </Transition>
            </>
          </Popover>
        </div>
      </div>
      )}
    </>
  )
}
If is_b2b is true, the dropdown is hidden. Otherwise, is_b2b is shown.
Test Products Page
Make sure your Medusa server is still running and restart your Next.js storefront.
Then, open the Next.js storefront and, after logging in as a B2B customer, click on the Store link in the navigation bar at the top left. You’ll see your list of product variants in a table.
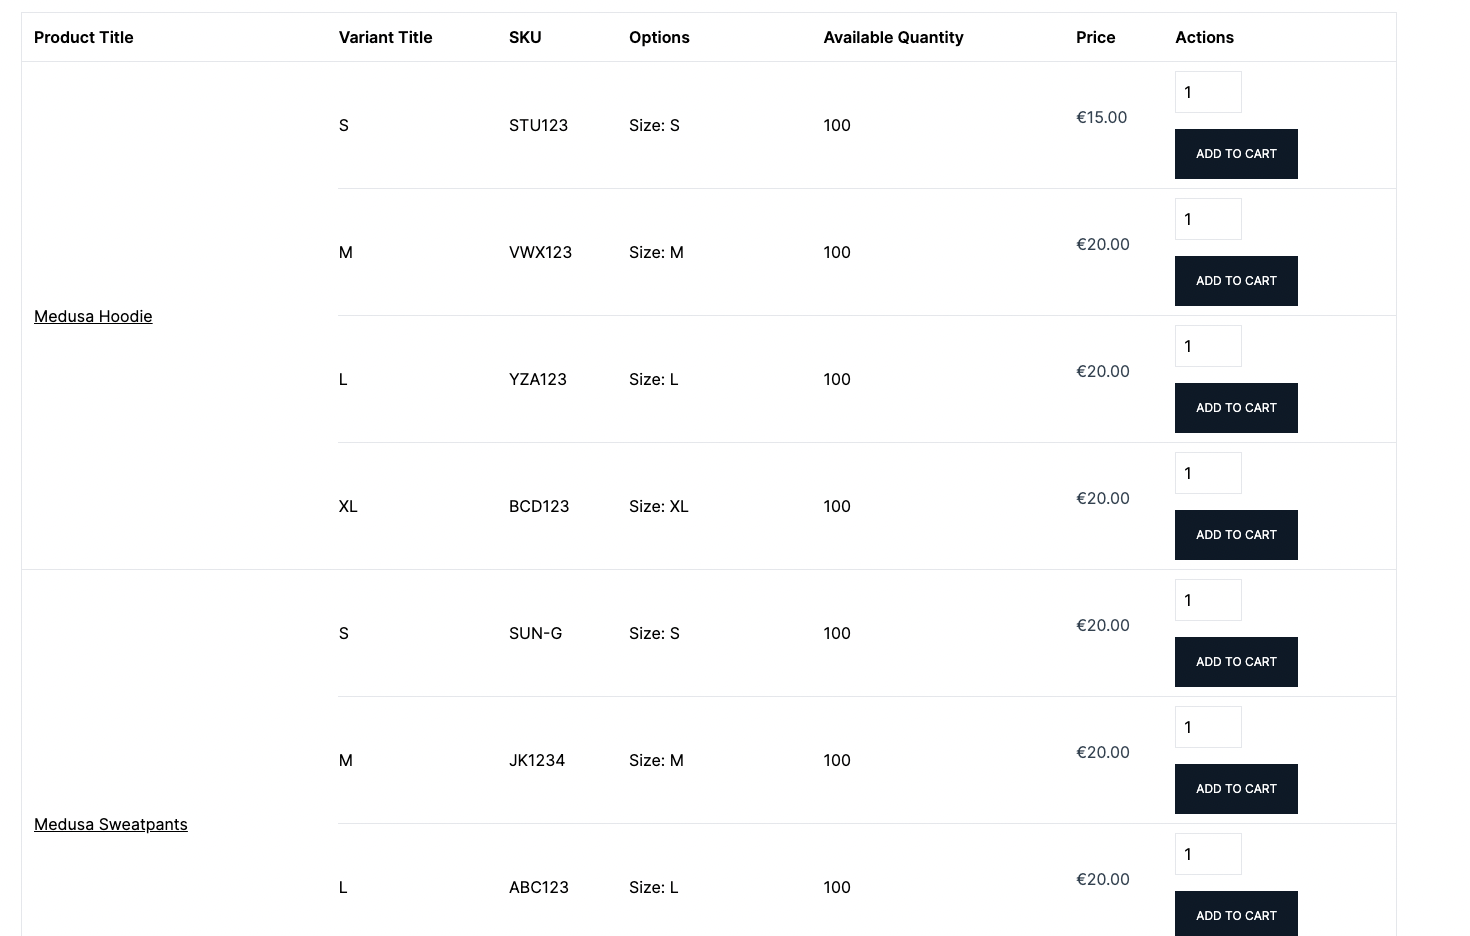
Notice how the prices of the variants are different than those shown to other customers. These prices are the prices you defined in the B2B Price List.
You can also test the prices with quantity-based conditions you added to the Price List. For example, if the condition was that product Medusa Hoodie’s variant S should have a different price if its quantity in the cart is more than 10, try changing the quantity to 10 or more and clicking Add to Cart. You’ll see a different price for that variant in the cart.
Test Checkout Flow
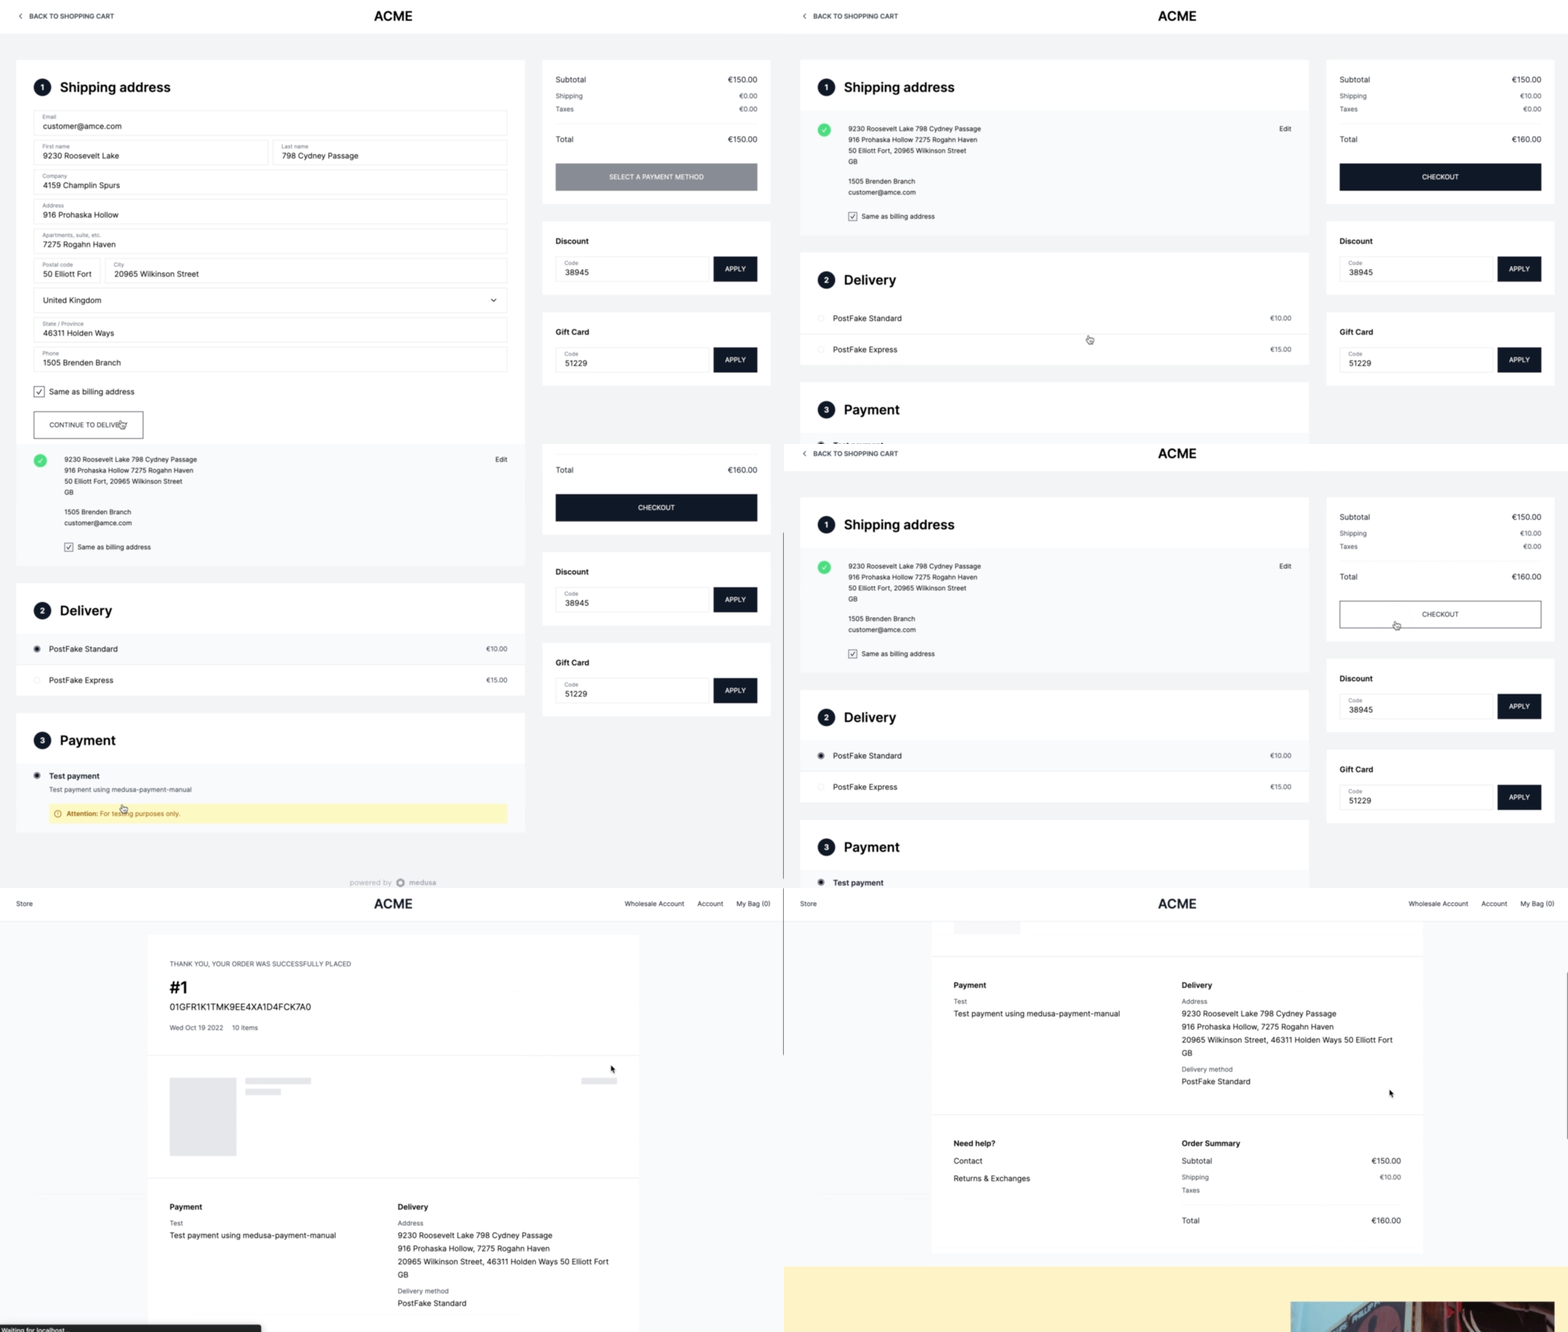
The checkout flow is pretty similar to those of regular customers:
Add a couple of items to the cart from the table.
Click on the My Bag link at the top right of the navigation bar.
Click on Go to Checkout.
Fill out the Shipping Address information and choose a Fulfillment method.
Choose a payment method. Since in this tutorial you didn’t add any payment methods, you’ll use the manual payment method. However, you can integrate many other payment methods with Medusa such as Stripe or PayPal, or create your own.
Click on the Checkout button.
This places the order on the Medusa server. Please note that Medusa does not capture the payment when an order is placed; it only authorizes it. You’ll need to capture it from the Medusa admin.
View Order Details on Medusa Admin
Run both the Medusa server and Medusa admin you created in part 1. Then, access the Medusa admin on localhost:7000.
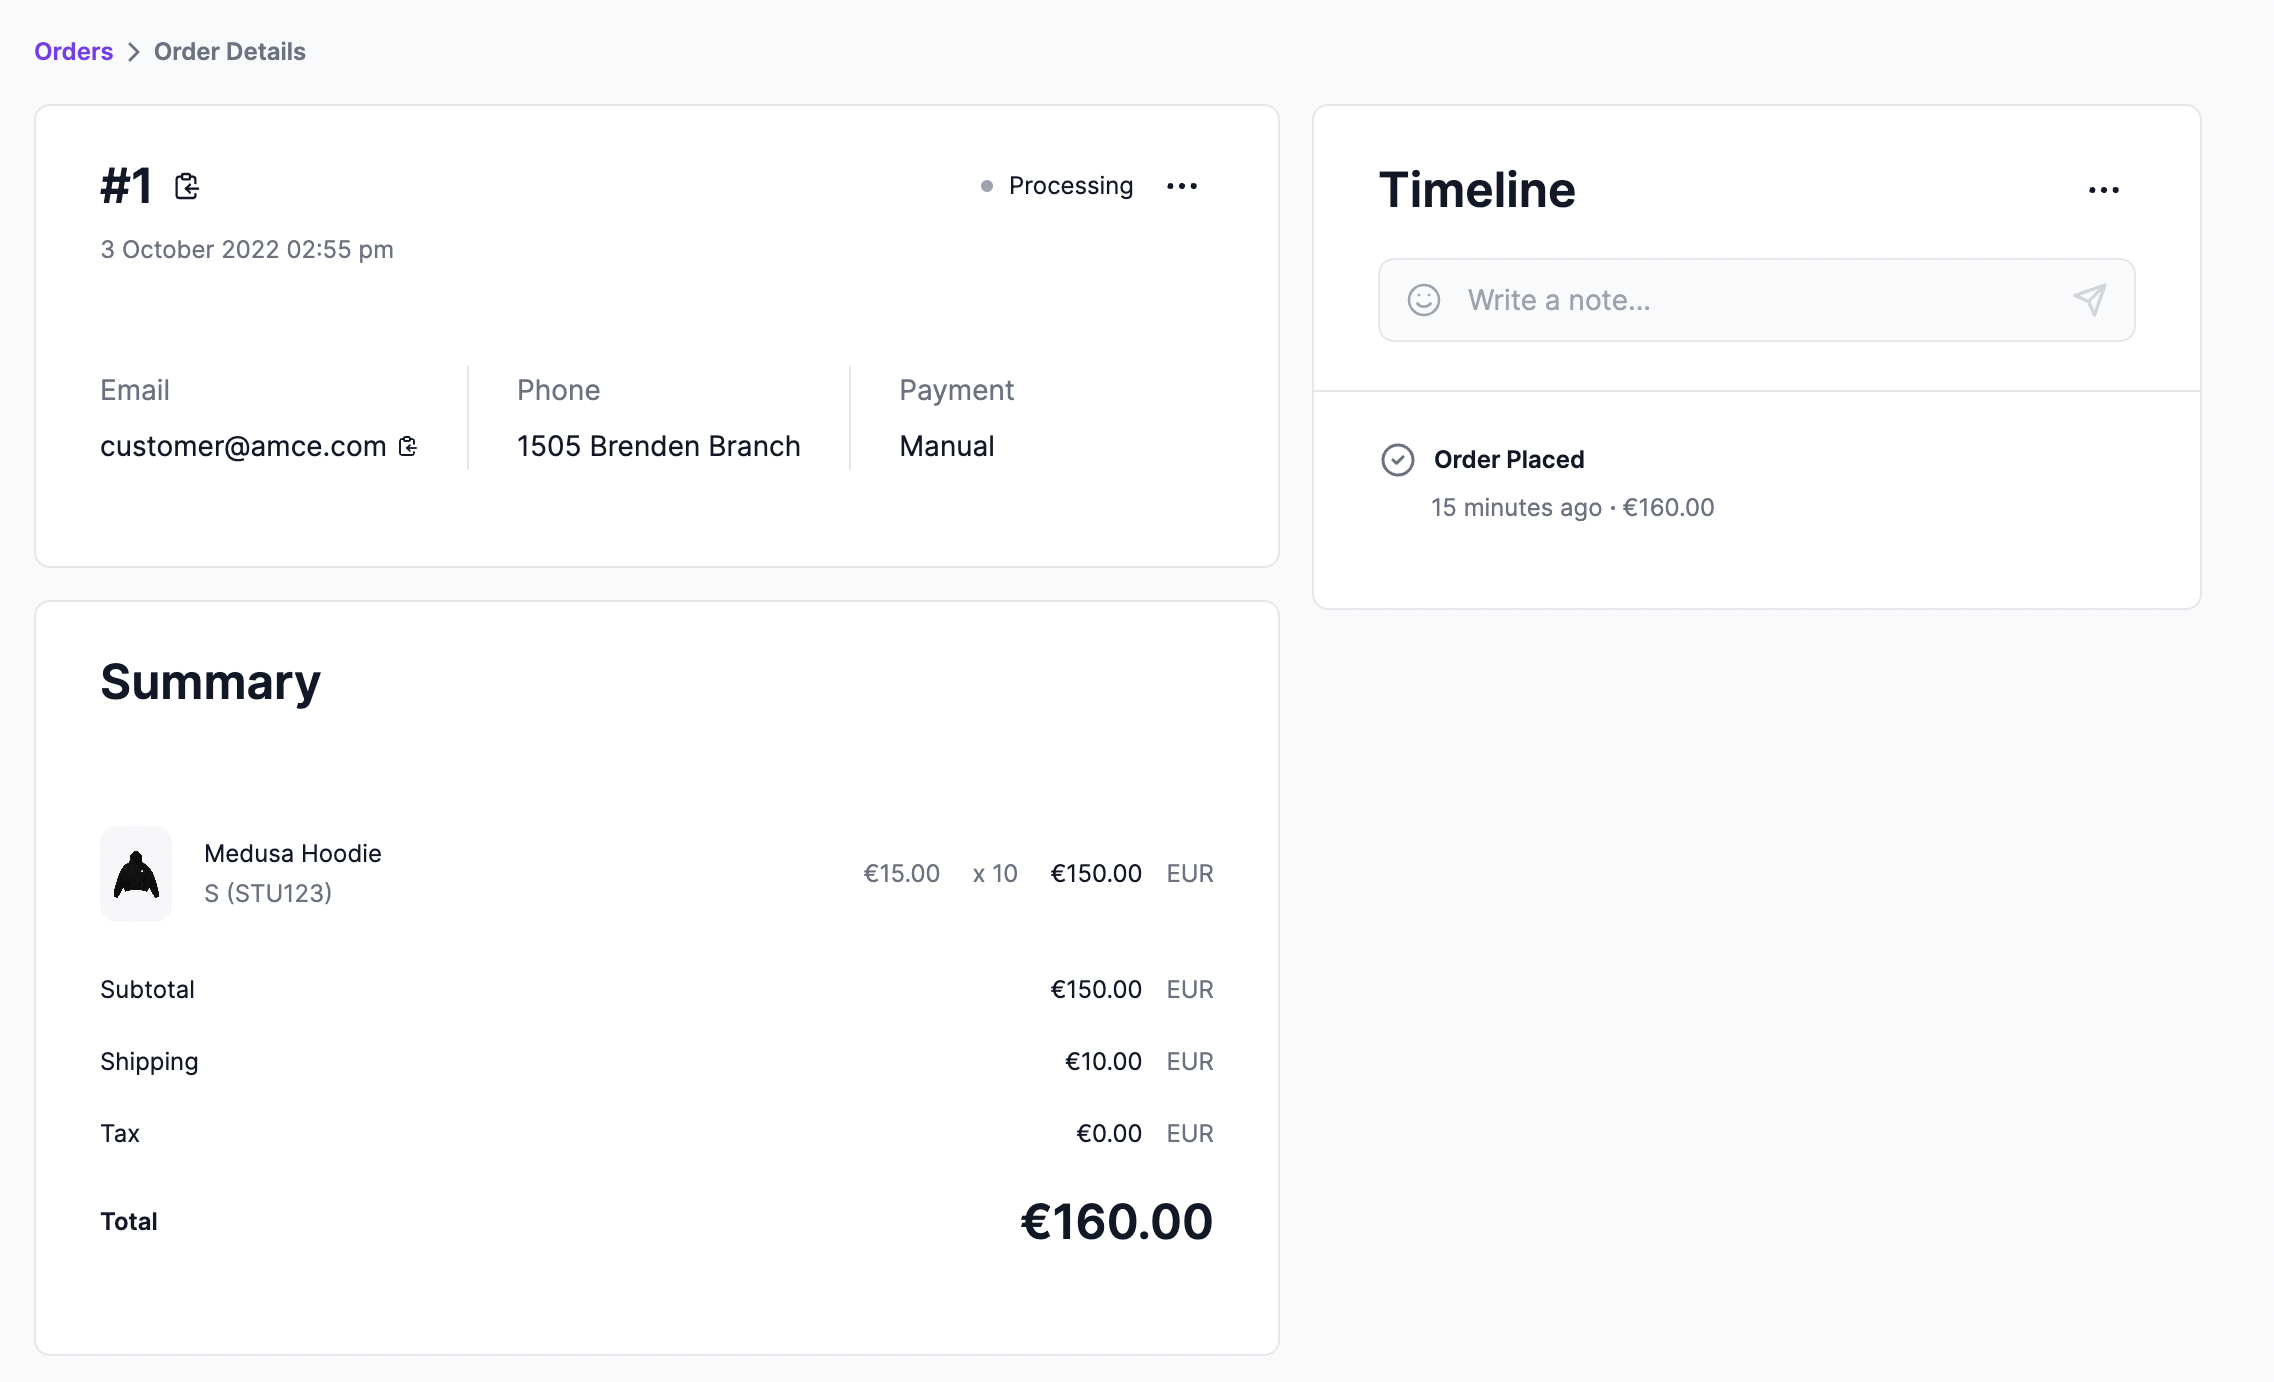
After logging in, you should see the list of orders in your store. In the list, you can see the payment status of the order, the sales channel, and more.
You should find the order you just created in the list. Click on the order to view its details.
On the order details page, you can see all the details of the order such as the items ordered, the payment and fulfillment details, the customer’s details, and more.
Capture Payment
To capture the payment of the order:
Scroll to the Payment section.
Click on the Capture Payment.
If you chose the Test payment provider during checkout, this will not actually do anything other than change the payment status of the order. If you’re using other payment providers such as Stripe, this is when the payment will actually be captured.
Conclusion
By following this two-part tutorial series, you should have the basis of a B2B ecommerce store built with Medusa. You can perform much more customizations and add additional features to your store including:
Add a payment provider. As mentioned, you can add payment providers like Stripe and PayPal, or create your own.
Integrate search engines such as Algolia or MeiliSearch.
Should you have any issues or questions related to Medusa, then feel free to reach out to the Medusa team via Discord.
