

How I Created a Nuxt.js Ecommerce Store from Scratch Using Medusa Part 2: Adding Cart Functionality


Table of contents
Introduction
An ecommerce shopping cart is something essential when you are building a storefront. It allows customers to add items to their cart so that they can later purchase it. Customers can also edit items in their cart at any point.
Medusa is an open source headless commerce platform that allows you to build digital commerce through its API with just a few commands. It gives you the flexibility you need to implement your own storefront from scratch using the frontend framework of your choice.
This tutorial is part of a series that revolves around creating a Nuxt.js ecommerce storefront using Medusa from scratch. The first part explains how to set up a starter storefront with Nuxt.js, link it with a Medusa server, and add products and product details pages.
In this guide, you will learn how to set up a cart flow for your Nuxt.js storefront. More specifically, it includes the following:
- A dropdown to allow the users to select their region.
- A popover cart to give the users a quick view of what is in the cart.
- Add products to the cart from the product detail page.
- A cart page to list the product in the cart with editing features.
You can find the final code for this part in this GitHub repository.
Prerequisites
This tutorial assumes you already followed along with part 1 of the series. If you haven’t, you can clone the GitHub repository with the first part branch and continue along from there.
Set Up Region Selection
The first thing you need to do is to set up the dropdown that allows choosing a region. When the customer selects a region, their cart will be updated to show the product prices with the currency that is set up for that region.
By default, the Medusa server comes with two regions, therefore two currencies (USD and EUR).
To have all your data’s storefront in sync, you will use a store to manage the application state. Luckily, Nuxt offers a store out-of-the-box. To activate it, go to the root of your storefront project and create a new folder called store if it doesn’t already exist.
Then, create the file store/index.js with the following content:
const REGION = 'medusa_region'
const COUNTRY = 'medusa_country'

export const state = () => ({
  country: undefined,
  region: undefined,
  regions: []
})

export const mutations = {
  UPDATE_REGION (state, payload) {
    state.region = payload.region
    state.country = payload.country || payload.region.countries[0]
    localStorage.setItem(REGION, JSON.stringify(state.region))
    localStorage.setItem(COUNTRY, JSON.stringify(state.country))
  },
  SET_REGIONS (state, regions) {
    state.regions = regions
  }
}

export const actions = {
  async initializeRegions ({ commit }) {
    const { data: { regions } } = await this.$axios('/regions')
    commit('SET_REGIONS', regions)

    if (localStorage) {
      const regionJSON = localStorage.getItem(REGION)
      const countryJSON = localStorage.getItem(COUNTRY)

      if (regionJSON && countryJSON) {
        const region = JSON.parse(regionJSON)
        const country = JSON.parse(countryJSON)
        commit('UPDATE_REGION', {
          region,
          country
        })
      } else {
        commit('UPDATE_REGION', { region: regions[0] })
      }
    }
  },

    updateRegion ({ state, commit, dispatch }, payload) {
      commit('UPDATE_REGION', payload)
    }
}
⚠️ To use axios in this form:
this.$axios('/regions')you need to update your axios base URL innuxt.config.jstohttp://localhost:9000/store, with this update you won’t need to prepend/storeeach time you need to make a request to your Medusa server.
In this file, you set up the initial state for the application. Within the state function you define variables to store the country and the region the customer chooses, and a regions array that you will use later on to display all the available regions in a dropdown.
The mutations object is in charge of updating the application state. So, whenever you need to update something, you commit a mutation that under the hood updates the state.
Finally, you have the actions object, it allows you to make some logic, for example, retrieve some data from an API, then commit a mutation to update the state with the data retrieved from the API.
In the initializeRegions action, you make a request to the Medusa server to retrieve all regions available for your storefront, then you commit the SET_REGIONS mutation to update the regions state.
Next, you check if the local storage contains the customer’s country and region to commit the UPDATE_REGION mutation with that data. Otherwise, you commit the mutation with the first region from the regions array.
Create Regions Dropdown Component
The next step is to add the component that displays the regions in the navigation bar.
Create the file components/Dropdowns/Regions.vue with the following content:
<template>
  <div class="relative text-left">
    <div v-if="$store.state.region">
      <button
        class="inline-flex justify-center w-full px-4 py-2 bg-white text-sm font-medium text-gray-700 hover:text-gray-600 flex items-center"
        @click="showRegionsMenu = !showRegionsMenu"
      >
        <span class="mr-1">{{ $store.state.country.display_name }} / {{ $store.state.region.currency_code.toUpperCase() }}</span>
        <svg
          xmlns="http://www.w3.org/2000/svg"
          width="20"
          height="20"
          viewBox="0 0 24 24"
        ><path fill="currentColor" d="m12 13.172l4.95-4.95l1.414 1.414L12 16L5.636 9.636L7.05 8.222z" /></svg>
      </button>
    </div>

    <div
      v-if="$store.state.regions.length > 0 && showRegionsMenu"
      class="origin-top-right absolute right-0 mt-2 w-56 px-6 py-2 rounded-md shadow-lg bg-white ring-1 ring-black ring-opacity-5 focus:outline-none"
    >
      <ul class="border-b border-ui last:border-b-0">
        <li v-for="(region) in $store.state.regions" :key="region.id" class="not-last:border-b border-gray-300">
          <button
            v-for="country in region.countries"
            :key="country.id"
            class="block py-3 text-sm w-full text-left text-gray-500 hover:text-black not-last:border-b border-gray-300"
            @click="$store.dispatch('updateRegion', {region: region, country: country})"
          >
            {{ country.display_name }} / {{ region.currency_code.toUpperCase() }}
          </button>
        </li>
      </ul>
    </div>
  </div>
</template>

<script>
export default {
  name: 'RegionsPopOver',
  data () {
    return {
      showRegionsMenu: false
    }
  }
}
</script>
In this component, you have a button with the showRegionsMenu prop to toggle the dropdown regions visibility. Then, you access all the regions available in the store with $store.state.regions and loop through them to make a list with all the regions’ countries.
Finally, for each country you have a button that dispatches the action $store.dispatch('updateRegion', {region: region, country: country}) every time the customer clicks on it, thus updating the customer region.
To actually use this component, open the file under components/App/Navbar.vue and replace the div container of the button “USA / USD” with the following:
<div class="hidden lg:flex">
    <!-- THIS IS THE NEW COMPONENT -->
  <dropdowns-regions />

    <!-- ADD BEFORE THIS -->
    <div class="relative inline-block text-left">
    <div>
      <button
        class="inline-flex justify-center w-full px-4 py-2 text-sm font-medium text-gray-700 hover:text-gray-600"
        type="button"
      >
        Account
      </button>
    </div>
  </div>
</div>
To see the dropdown in action, you need to create a Nuxt plugin that calls the initializeRegions action every time your storefront is visited or when the customer refreshes the page.
Go to the root of your storefront project and create the file plugins/nuxtInit.client.js with the following content:
export default async function (context) {
  await context.store.dispatch('initializeRegions', context)
}
Next, open your nuxt.config.js and update the plugins property with the following:
plugins: [
  { src: '~/plugins/nuxtInit.client.js', mode: 'client' }
],
Test the Regions Dropdown
Make sure your Medusa server is running. Then, start your Nuxt.js server with the following command:
yarn dev
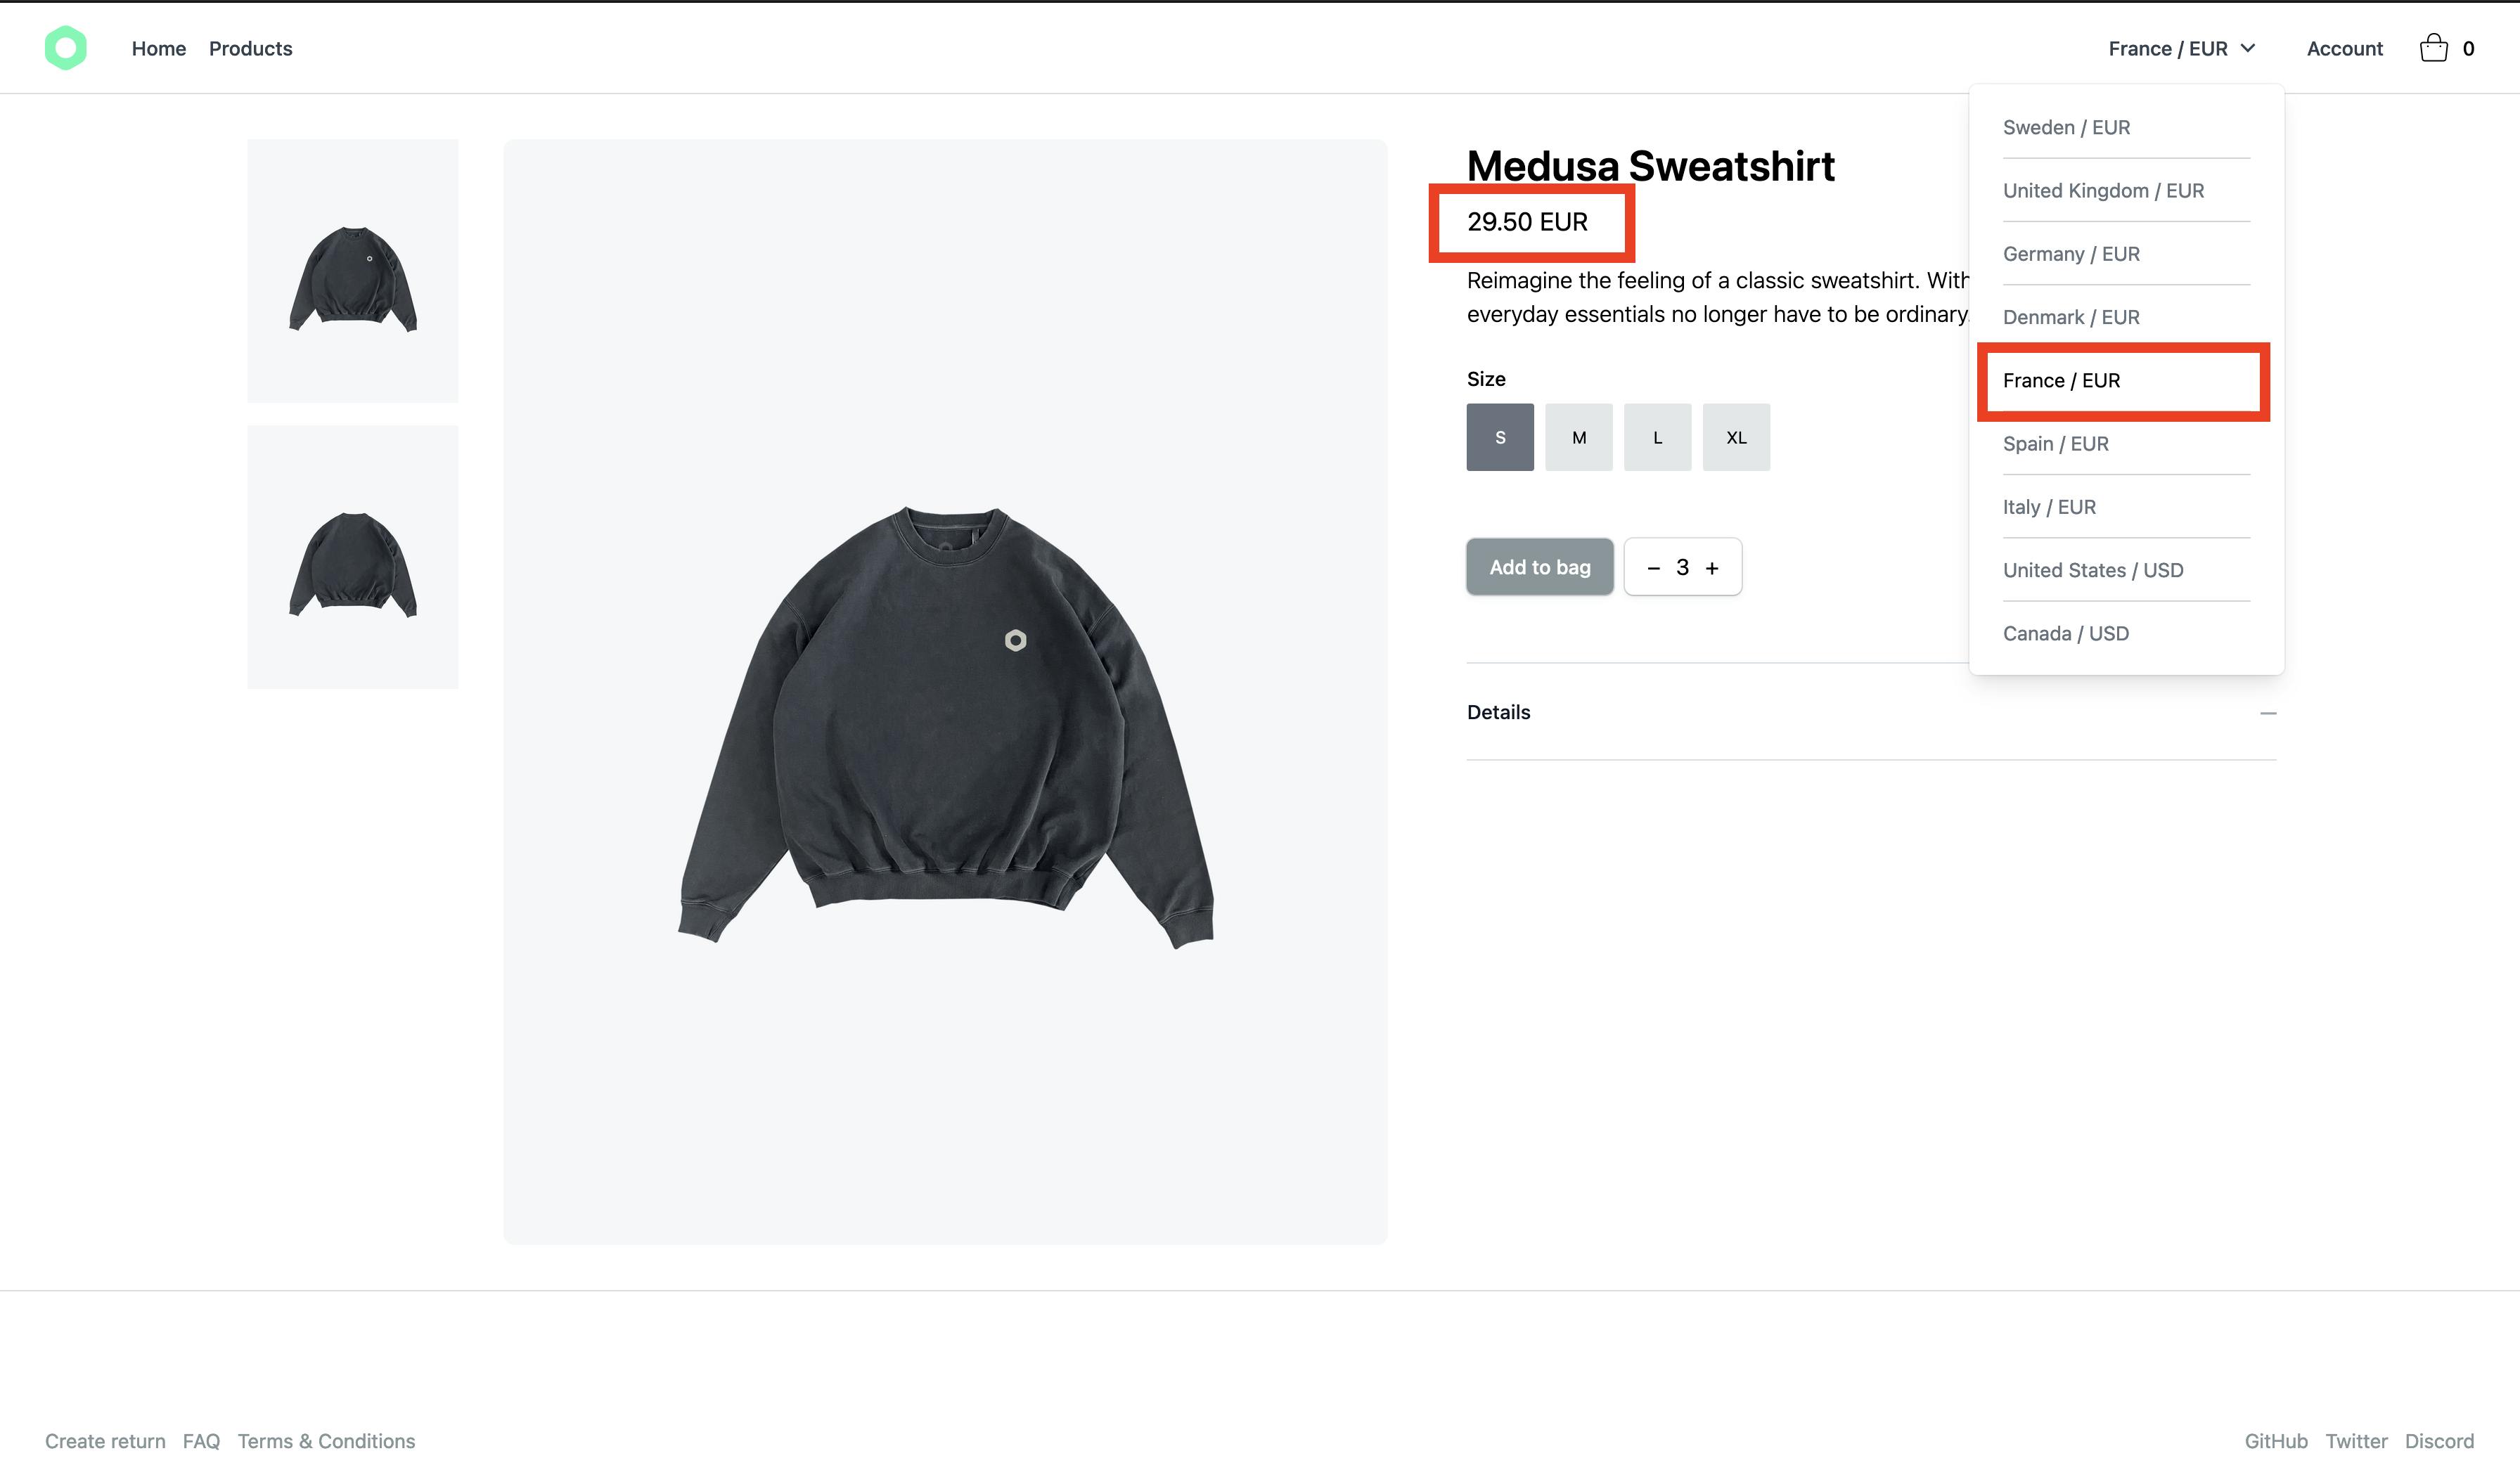
Go to the URL http://localhost:3333. You should find in the navigation bar next to “Account” a region specified in the form of “country/currency”. Click on it and you’ll see a dropdown with different countries and currencies to select from.

Whatever item you choose from the dropdown, the region is immediately updated on the storefront. However, if you check the price on the products at the bottom of the home page, you will see that right now the currency is not in sync with the region selected in the dropdown. That will be fixed once you implement the cart in the next section.
Implement Cart flow
In this section, you will implement all the features related to the cart flow. This includes setting up a store to manage the cart, the components to add or remove products from the cart, a cart popover component to show a quick summary of products in the cart, and a cart page where the customer can have a detailed overview of items in the cart and cart totals.
Initialize a cart
Similar to what you did with the regions, you first need an initializer that allows you to retrieve a cart ID from local storage if it exists. Otherwise, you make a request to your Medusa server to create a new cart for the customer.
Open store/index.js and add the following at the beginning of the file:
const CART_ID = 'cart_id'
then in the actions object add the initializeCart function:
export const actions = {
  ...,

  async initializeCart ({ state, commit }) {
    const existingCartId = localStorage ? localStorage.getItem(CART_ID) : undefined

    if (existingCartId) {
      try {
        const { data: { cart } } = await this.$axios(`/carts/${existingCartId}`)

        if (!cart.completed_at) {
          commit('cart/SET_CART', cart)
        }
      } catch (e) {
        localStorage.removeItem(CART_ID)
      }
    } else {
      const { cart } = await this.$axios.$post('/carts', { region_id: state.region.id, country_code: state.country.country_code })
      commit('cart/SET_CART', cart)
    }
  },
}
This action first checks if there is a cart_id saved in the localStorage. If so, it will retrieve the cart from the Medusa server and if the cart isn’t completed yet it will commit the SET_CART mutation to load it to the state of the storefront.
If there isn’t any cart stored in the local storage, then it will create a new one and will commit the SET_CART mutation to set the cart in the current storefront state.
Next, you need to create a namespaced module to manage the cart state, getters, mutations, and actions.
Create the file store/cart.js with the following content:
export const state = () => ({
  cart: {
    items: []
  }
})

export const getters = {
  items: state => state.cart.items,
  cartCurrencyCode: state => state.cart.region.currency_code
}

export const mutations = {
  SET_CART (state, cart) {
    state.cart = cart
    localStorage.setItem('cart_id', cart.id)
  }
}

export const actions = {
  async updateCart ({ state, commit }, payload) {
    const { cart } = await this.$axios.$post(`/carts/${state.cart.id}`, { ...payload })
    commit('SET_CART', cart)
  },

  async addItem ({ state, commit }, item) {
    let cartId = state.cart.id

    if (!cartId) {
      const { cart: newCart } = await this.$axios.$post('/carts')
      commit('SET_CART', newCart)
      cartId = newCart.id
    }

    const { cart: updateCart } = await this.$axios.$post(`/carts/${cartId}/line-items`, { ...item })
    commit('SET_CART', updateCart)
  },

  async removeItem ({ state, commit }, itemId) {
    const { cart } = await this.$axios.$delete(`/carts/${state.cart.id}/line-items/${itemId}`)
    commit('SET_CART', cart)
  },

  async updateQuantity ({ state, commit }, item) {
    const { cart } = await this.$axios.$post(`/carts/${state.cart.id}/line-items/${item.id}`, { quantity: item.quantity })
    commit('SET_CART', cart)
  }
}
In the state function, you set up an initial state for the cart within an empty array of items to avoid errors when rendering the storefront pages. Later on, when the cart is initialized or retrieved from the Medusa server, the state will be updated with the response from the cart endpoint.
In the getters object you set two getters to get some nested properties from the cart state. You can see this as a shortcut to get a specific property in an object in the state.
Next comes the mutations object that only has the mutation in charge of updating the state within the cart.
Finally, there is the actions object with four functions: the first one is to update the cart properties; the second is to add items to the cart; the third is to remove items from the cart; the fourth is to update items quantity in the cart. All those functions make a request to a specific endpoint on your Medusa server.
The last step to get the cart store working is to update the plugins/nuxtInit.client.js file with the following content:
export default async function (context) {
  await context.store.dispatch('initializeRegions', context)
  await context.store.dispatch('initializeCart', context)
}
With this update, you dispatch the initializCart action that runs whenever a customer visits the storefront or the storefront page is refreshed.
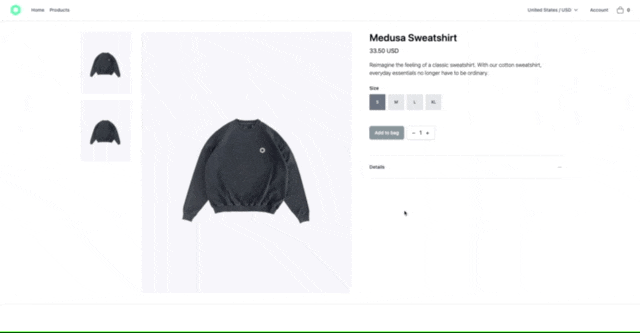
Go to your storefront home page and refresh the page. Then, open the web inspector and click on the Storage tab. You should see under Local Storage the cart_id key with an ID as a value.
Implement Add Items to Cart
The next step is to add the components responsible to add products to the cart.
Create the file components/QuantitySelector.vue with the following content:
<template>
  <div class="flex items-center rounded-md px-4 py-2 shadow">
    <button @click="$emit('decrement', quantity - 1)">
      –
    </button>
    <span class="w-8 text-center">{{ quantity }}</span>
    <button @click="$emit('increment', quantity + 1)">
      +
    </button>
  </div>
</template>

<script>
export default {
  name: 'QuantitySelector',
  props: {
    quantity: {
      type: Number,
      default: 1
    }
  }
}
</script>
This component receives only one prop with the current quantity and it has two buttons in charge of emitting events to its parent container to call the functions to increase or decrease the quantity of the current item.
Next, open the pages/products/_id.vue file. and add these three properties in the data object:
data () {
  return {
    ...
    quantity: 1,
    variant_id: null,
    lowestPrice: {}
  }
},
The quantity property is used to store the product quantity; the variant_id is used to set the id of the variant chosen by the customer and the lowestPrice, as the name suggests, is to get the lowest price for that product.
Then, import mapActions right after the open script tag:
<script>
import { mapActions } from 'vuex'

//...
And replace everything after the data property with the following:
async fetch () {
  try {
    const { product } = await this.$axios.$get(`/products/${this.$route.params.id}`)
    this.product = product
    this.imageToShow = this.product.images[0].id
    this.filterLowestPrice()
  } catch (e) {
    // eslint-disable-next-line no-console
    console.log('The server is not responding')
  }
},

computed: {
  currencyCode () {
    return this.$store.state.region.currency_code || 'usd'
  }
},
watch: {
  currencyCode () {
    this.filterLowestPrice()
  }
},
methods: {
  ...mapActions({
    addItem: 'cart/addItem'
  }),
    increment () {
    this.quantity += 1
  },
  decrement () {
    if (this.quantity > 1) { this.quantity -= 1 }
  },
  updateSelectedOptions (value) {
    const variant = this.product.variants.reduce((acc, cur) => {
      return [...acc, {
        variantId: cur.id,
        options: cur.options.map(o => o.value)
      }]
    }, []).filter((variant) => {
      return Object.values(value).sort().join('__') === variant.options.sort().join('__')
    })

    this.variant_id = variant[0].variantId
  },
  filterLowestPrice () {
    this.lowestPrice = this.product.variants
      .reduce((prices, cur) => {
        return [...prices, ...cur.prices.filter(price => price.currency_code === this.currencyCode)]
      }, [])
      .sort((a, b) => a.amount - b.amount)[0]
  }
}
First, the computed property currencyCode is used to retrieve the current currency code from the store that matches the region selected by the customer.
Next, you have a watcher in charge of tracking any update that the currency code could have. For example, if the customer selects other regions, the watcher detects this change and runs the filterLowestPrice() function to set the lowestPrice in the data property that you add earlier.
In the methods object, you can find the mapActions helper. This lets you use the action addItem created on the cart store but within a component. What this action does is send a request to your Medusa server to add an item to the cart.
The increase and decrease functions are responsible to update the quantity property added earlier.
The updateSelectedOptions function is used to set the specific variant_id chosen for that product by the customer.
Lastly, the filterLowestPrice function filters the product prices to get the lowest price based on the selected currency code.
Next, you need to add a utility function that formats the product prices. Create the file utils/format-price.js with the following content:
export const formatPrice = (amount, currencyCode, quantity = 1) => {
  return (amount / 100 * quantity).toFixed(2) +
    ' ' +
    currencyCode.toUpperCase()
}
This function takes three parameters: the amount, the currency code, and the quantity; then, it calculates the total amount based on the quantity and returns a formatted string with the currency code.
Go back to pages/products/_id.vue and replace the quantity component that was below the “Add to bag” button with the quantity-selector component:
<div class="inline-flex mt-12">
  <button class="btn-ui mr-2 px-12" @click="addItem({variant_id, quantity})">
    Add to bag
  </button>

    <!-- THIS IS THE NEW COMPONENT -->
  <quantity-selector
    :quantity="quantity"
    @increment="increment"
    @decrement="decrement"
  />
</div>
Also, replace the part displaying the price with the following:
<p v-if="lowestPrice.currency_code" class="text-lg mt-2 mb-4">
  {{ formatPrice(lowestPrice.amount, lowestPrice.currency_code) }}
</p>
Make sure to import formatPrice in the script section and add the method in the methods property:
<script>
import { formatPrice } from '~/utils/format-price'

export default {
  ...

  methods: {
        ...
    formatPrice // <--------------------------- ADD HERE
  }
}
</script>
Next, you need to create a new component that shows the product options available to the customer to choose from.
Create the file components/Products/Options.vue with the following content:
<template>
  <div>
    <div v-for="option in filteredOptions" :key="option.id" class="mt-6">
      <div class="text-sm">
        <p class="font-medium mb-2">
          {{ option.title }}
        </p>
        <div>
          <button
            v-for="value in option.values"
            :key="value.id"
            :class="value.value === currentOptions[option.id] ? 'bg-gray-500 text-white' : 'bg-gray-200 text-black'"
            class="inline-flex items-center justify-center rounded-sm text-xs h-12 w-12 mr-2 last:mr-0 hover:bg-gray-500 hover:text-white"
            @click="updateOption(option.id, value.value )"
          >
            {{ value.value }}
          </button>
        </div>
      </div>
    </div>
  </div>
</template>,

<script>
export default {
  name: 'ProductOptions',
  props: {
    options: {
      type: Array,
      default () { return [] }
    }
  },
  data () {
    return {
      currentOptions: { }
    }
  },
  computed: {
    filteredOptions () {
      return this.options.map((option) => {
        option.values = option.values.reduce((acc, curr) => {
          if (!acc.find(val => val.value === curr.value)) {
            return [...acc, { ...curr }]
          }
          return acc
        }, [])

        return option
      })
    }
  },
  watch: {
    options (val) {
      this.currentOptions = val.reduce((acc, curr) => {
        return { ...acc, [curr.id]: curr.values[0].value }
      }, {})
      this.$emit('updateSelectedOptions', this.currentOptions)
    }
  },
  methods: {
    updateOption (optionId, value) {
      this.currentOptions[optionId] = value
      this.$emit('updateSelectedOptions', this.currentOptions)
    }
  }
}
</script>
This component renders all the options available for a specific product. It receives a prop with all the options. It also has a data property to store the currently selected option.
Additionally, it has a computed property filteredOptions that filters the options to avoid duplicates. The watcher is used to update the currentOptions property when the component is rendered the first time.
The updateOption function sets the selected option to the currentOptions property, then emits the updateSelectedOptions event to its parent container with the value of the current option.
Now, go back to pages/products/_id.vue and search for the div where you were looping the options before. It should be below the product description.
Replace it with the Options component that you just created:
<p class="font-light">
  {{ product.description }}
</p>

<!-- THIS IS THE NEW COMPONENT -->
<products-options
  :options="product.options"
  @updateSelectedOptions="updateSelectedOptions"
/>
The last thing to do to finish the add items to cart functionality is to update the “Add to bag” button in pages/products/_id.vue. Replace the button with the following:
<button class="btn-ui mr-2 px-12" @click="addItem({variant_id, quantity})">
  Add to bag
</button>
You run the addItem function whenever the customer clicks on the button.
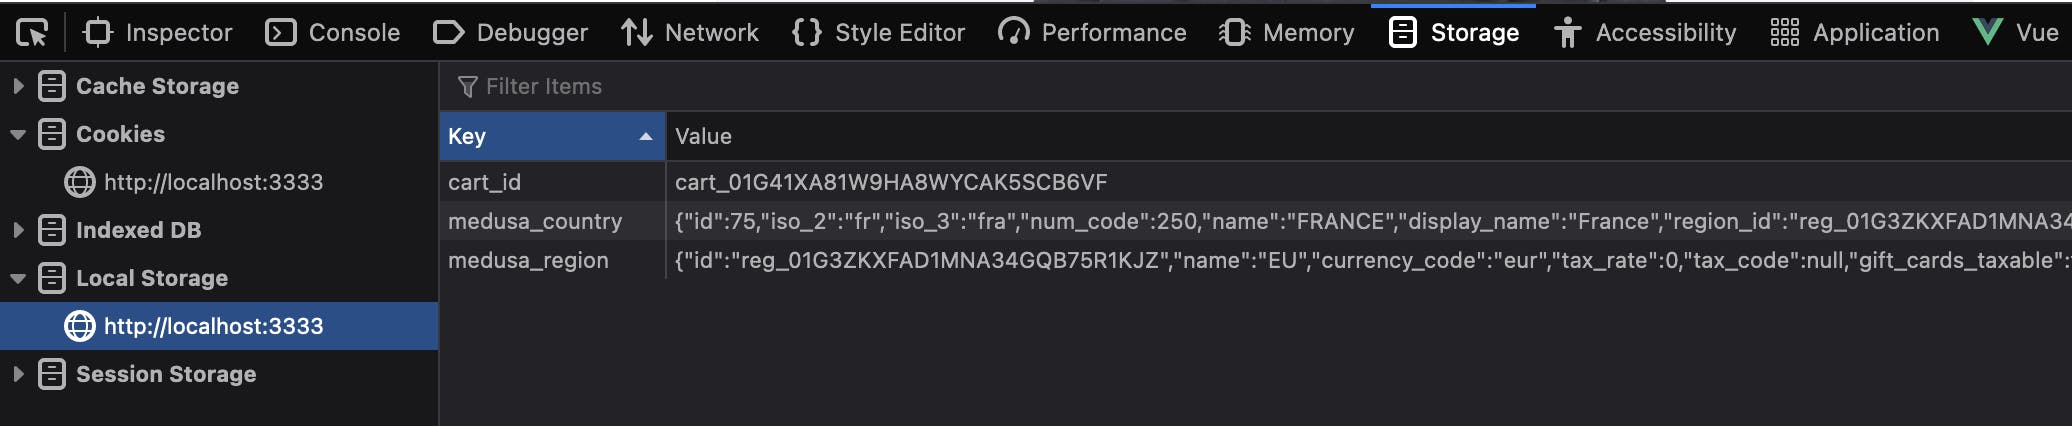
Test Add to Cart Functionality
To test it out, go to your storefront products page, then click on a product. You should see the products details page.
Try changing to another region from the regions dropdown and you should see the product price and currency code updated immediately matching the selected region.
Also, if you click on the plus quantity button you should see how the quantity increases. On the other hand, if you click on the minus quantity button the quantity decreases.
Finally, if you click on the Add to bag button, based on the example shown above, a Medusa Sweatshirt Size S will be added to the cart.
You will be able to see the product added to the cart once the cart popover is implemented in the upcoming sections.
Update ProductCart component
Before you add the cart popover, you should update the ProductCard component to use the newly created format-price utility function.
Move the file components/ProductCard.vue to the components/Products directory and rename it to Card.vue. The full path should now be components/Products/Card.vue.
Then, open the Card.vue component and replace the p element that renders the price with the following:
<p class="text-sm font-semibold text-gray-900">
  from {{ formatPrice(lowestPrice.amount, lowestPrice.currency_code) }}
</p>
Remember to import the function at the start of the script tag and add it to the methods object:
<script>
import { formatPrice } from '~/utils/format-price'

export default {
  ...

  methods: {
        ...
    formatPrice // <--------------------------- ADD HERE
  }
}
</script>
Finally, replace the computed lowestPrice property to get the currency code from the cart store:
computed: {
  lowestPrice () {
    return this.item.variants
      .reduce((prices, cur) => {
        return [...prices, ...cur.prices.filter(price => price.currency_code === this.$store.getters['cart/cartCurrencyCode'])]
      }, [])
      .sort((a, b) => a.amount - b.amount)[0] || { amount: 1, currency_code: 'usd' }
  }
},
Next, open store/index.js and update the updateRegion action to the following:
export const actions = {
  ...
  updateRegion ({ state, commit, dispatch }, payload) {
    commit('UPDATE_REGION', payload)
    dispatch('cart/updateCart', {
      region_id: state.region.id
    })
  }
}
With this code, you dispatch the cart/updateCart action whenever the customer changes their region.
Now, you need to update the ProductCard that was previously used to use the updated Card component.
Open pages/index.vue and replace the <ProductCard /> component with the new <products-card/> component:
<div class="grid grid-cols-4 gap-8 ">
    <!--- before this component was ProductCard --->
  <products-card
    v-for="product in products"
    :key="product.id"
    :item="product"
  />
</div>
Similarly, open pages/products/index.vue and replace the <ProductCard /> component with the new <products-card/> component:
<div
  v-if="products.length"
  class="grid grid-cols-4 gap-8 "
>
    <!--- before this component was ProductCard --->
  <products-card
    v-for="product in products"
    :key="product.id"
    :item="product"
  />
</div>
To test it out, go to your products page and select a different country with a different currency from the region’s dropdown. You should see the product prices get updated instantly.
Add Cart Popover
To allow customers to see what is in their cart, you’ll implement a cart popover that shows a quick summary of the list of products in the cart.
Create a new file components/Dropdowns/CartPopoverItem.vue with the following content:
<template>
  <li class="flex">
    <div class="overflow-hidden rounded-md mr-4 bg-gray-100">
      <img class="w-16 h-auto" :src="item.thumbnail" :alt="item.title">
    </div>
    <div class="flex flex-col justify-between py-2 space-y-2">
      <div>
        <p class="font-medium text-sm">
          {{ item.title }}
        </p>
        <p class="text-xs mt-2">
          <span class="text-gray-500">Variant:</span> {{ item.description }}
        </p>
      </div>
      <div class="flex items-center font-light text-xs">
        <p>
          <span class="text-gray-500">Quantity</span>
          <span>{{ item.quantity }}</span>
        </p>
        <div class="w-px h-4 bg-ui-dark mx-3" />
        <p>
          <span class="text-gray-500">Price</span>
          <span>
            {{ formatPrice(item.unit_price, cartCurrencyCode, item.quantity) }}
          </span>
        </p>
      </div>
    </div>
  </li>
</template>

<script>
import { formatPrice } from '@/utils/format-price'

export default {
  name: 'CartPopoverItem',
  props: {
    item: {
      type: Object,
      default () {
        return {
          title: 'Item added',
          description: 'Description item',
          quantity: 1,
          unit_price: 9.5,
          thumbnail: ''
        }
      }
    }
  },
  computed: {
    cartCurrencyCode () {
      return this.$store.state.cart.cart.region.currency_code
    }
  },
  methods: {
    formatPrice
  }

}
</script>
This component is used to display each cart item. It receives a product as a prop and renders it in the dropdown showing the product’s title, the variant is chosen, the quantity, and the total amount.
Next, create the file components/Dropdowns/CartPopover.vue with the following content:
<template>
  <div class="relative inline-block text-left">
    <div id="cartButton">
      <button
        class="inline-flex items-center justify-center w-full py-2 bg-white text-sm font-medium hover:opacity-1/2"
        @click="showCart = !showCart"
      >
        <svg width="40" height="41" viewBox="0 0 40 41" fill="none" xmlns="http://www.w3.org/2000/svg">
          <path
            fill-rule="evenodd"
            clip-rule="evenodd"
            d="M14.9968 16.2273C14.9921 16.1189 14.9888 16.0004 14.9877 15.8734C14.9826 15.2497 15.0333 14.4053 15.2648 13.551C15.4962 12.6975 15.9164 11.8043 16.6719 11.123C17.4366 10.4333 18.5016 10 19.9419 10C21.3822 10 22.4472 10.4333 23.212 11.123C23.9674 11.8043 24.3877 12.6975 24.619 13.551C24.8506 14.4053 24.9012 15.2497 24.8961 15.8734C24.8951 16.0004 24.8917 16.1189 24.887 16.2273H27.8836C29.0776 16.2273 30.0056 17.2667 29.8708 18.4531L28.7344 28.4531C28.6196 29.4638 27.7644 30.2273 26.7472 30.2273H13.1366C12.1194 30.2273 11.2643 29.4638 11.1494 28.4531L10.013 18.4531C9.87822 17.2667 10.8062 16.2273 12.0002 16.2273H14.9968ZM23.8859 16.2273C23.8912 16.1186 23.8951 15.9971 23.8962 15.8652C23.9008 15.2957 23.8535 14.5493 23.6538 13.8126C23.454 13.0752 23.1098 12.3775 22.5422 11.8656C21.984 11.3622 21.1673 11 19.9419 11C18.7165 11 17.8999 11.3622 17.3416 11.8656C16.774 12.3775 16.4299 13.0752 16.23 13.8126C16.0303 14.5493 15.983 15.2957 15.9877 15.8652C15.9888 15.9971 15.9926 16.1186 15.9979 16.2273H23.8859ZM12.0002 17.2273H27.8836C28.4806 17.2273 28.9446 17.747 28.8772 18.3402L27.7408 28.3402C27.6834 28.8455 27.2558 29.2273 26.7472 29.2273H13.1366C12.628 29.2273 12.2004 28.8455 12.143 28.3402L11.0066 18.3402C10.9392 17.747 11.4032 17.2273 12.0002 17.2273ZM15.4874 20.0455C15.8388 20.0455 16.1237 19.7605 16.1237 19.4091C16.1237 19.0576 15.8388 18.7727 15.4874 18.7727C15.1359 18.7727 14.851 19.0576 14.851 19.4091C14.851 19.7605 15.1359 20.0455 15.4874 20.0455ZM25.0328 19.4091C25.0328 19.7605 24.7479 20.0455 24.3965 20.0455C24.045 20.0455 23.7601 19.7605 23.7601 19.4091C23.7601 19.0576 24.045 18.7727 24.3965 18.7727C24.7479 18.7727 25.0328 19.0576 25.0328 19.4091Z"
            fill="black"
          /></svg>
        <span>{{ countItems }}</span>
      </button>
    </div>

    <div
      v-if="showCart"
      id="cartPopover"
      class="origin-top-right absolute right-0 mt-2 w-96 px-6 py-4 rounded-md shadow-lg bg-white ring-1 ring-black ring-opacity-5 focus:outline-none"
    >
      <div class="py-1">
        <div v-if="items.length === 0" class="flex justify-center">
          <p>Your cart is empty </p>
        </div>

        <div v-else>
          <ul class="py-2 first:pt-0 space-y-3">
            <dropdowns-cart-popover-item v-for="item in items" :key="item.id" :item="item" />
          </ul>

          <div class="flex flex-col mt-4">
            <div>
              <div>
                <button class="btn-ui font-medium px-4 py-2 mb-2 text-sm w-full">
                  Checkout
                </button>
              </div>
            </div>
            <div>
              <nuxt-link to="/shopping-bag">
                <button class="text-ui-dark py-2 text-sm w-full">
                  View Shopping Bag
                </button>
              </nuxt-link>
            </div>
          </div>
        </div>
      </div>
    </div>
  </div>
</template>

<script>
import { mapGetters } from 'vuex'

export default {
  name: 'CartPopover',
  data () {
    return {
      showCart: false
    }
  },
  computed: {
    ...mapGetters({ items: 'cart/items' }),
    countItems () {
      return this.items.reduce((sum, i) => sum + i.quantity, 0)
    }
  }
}
</script>
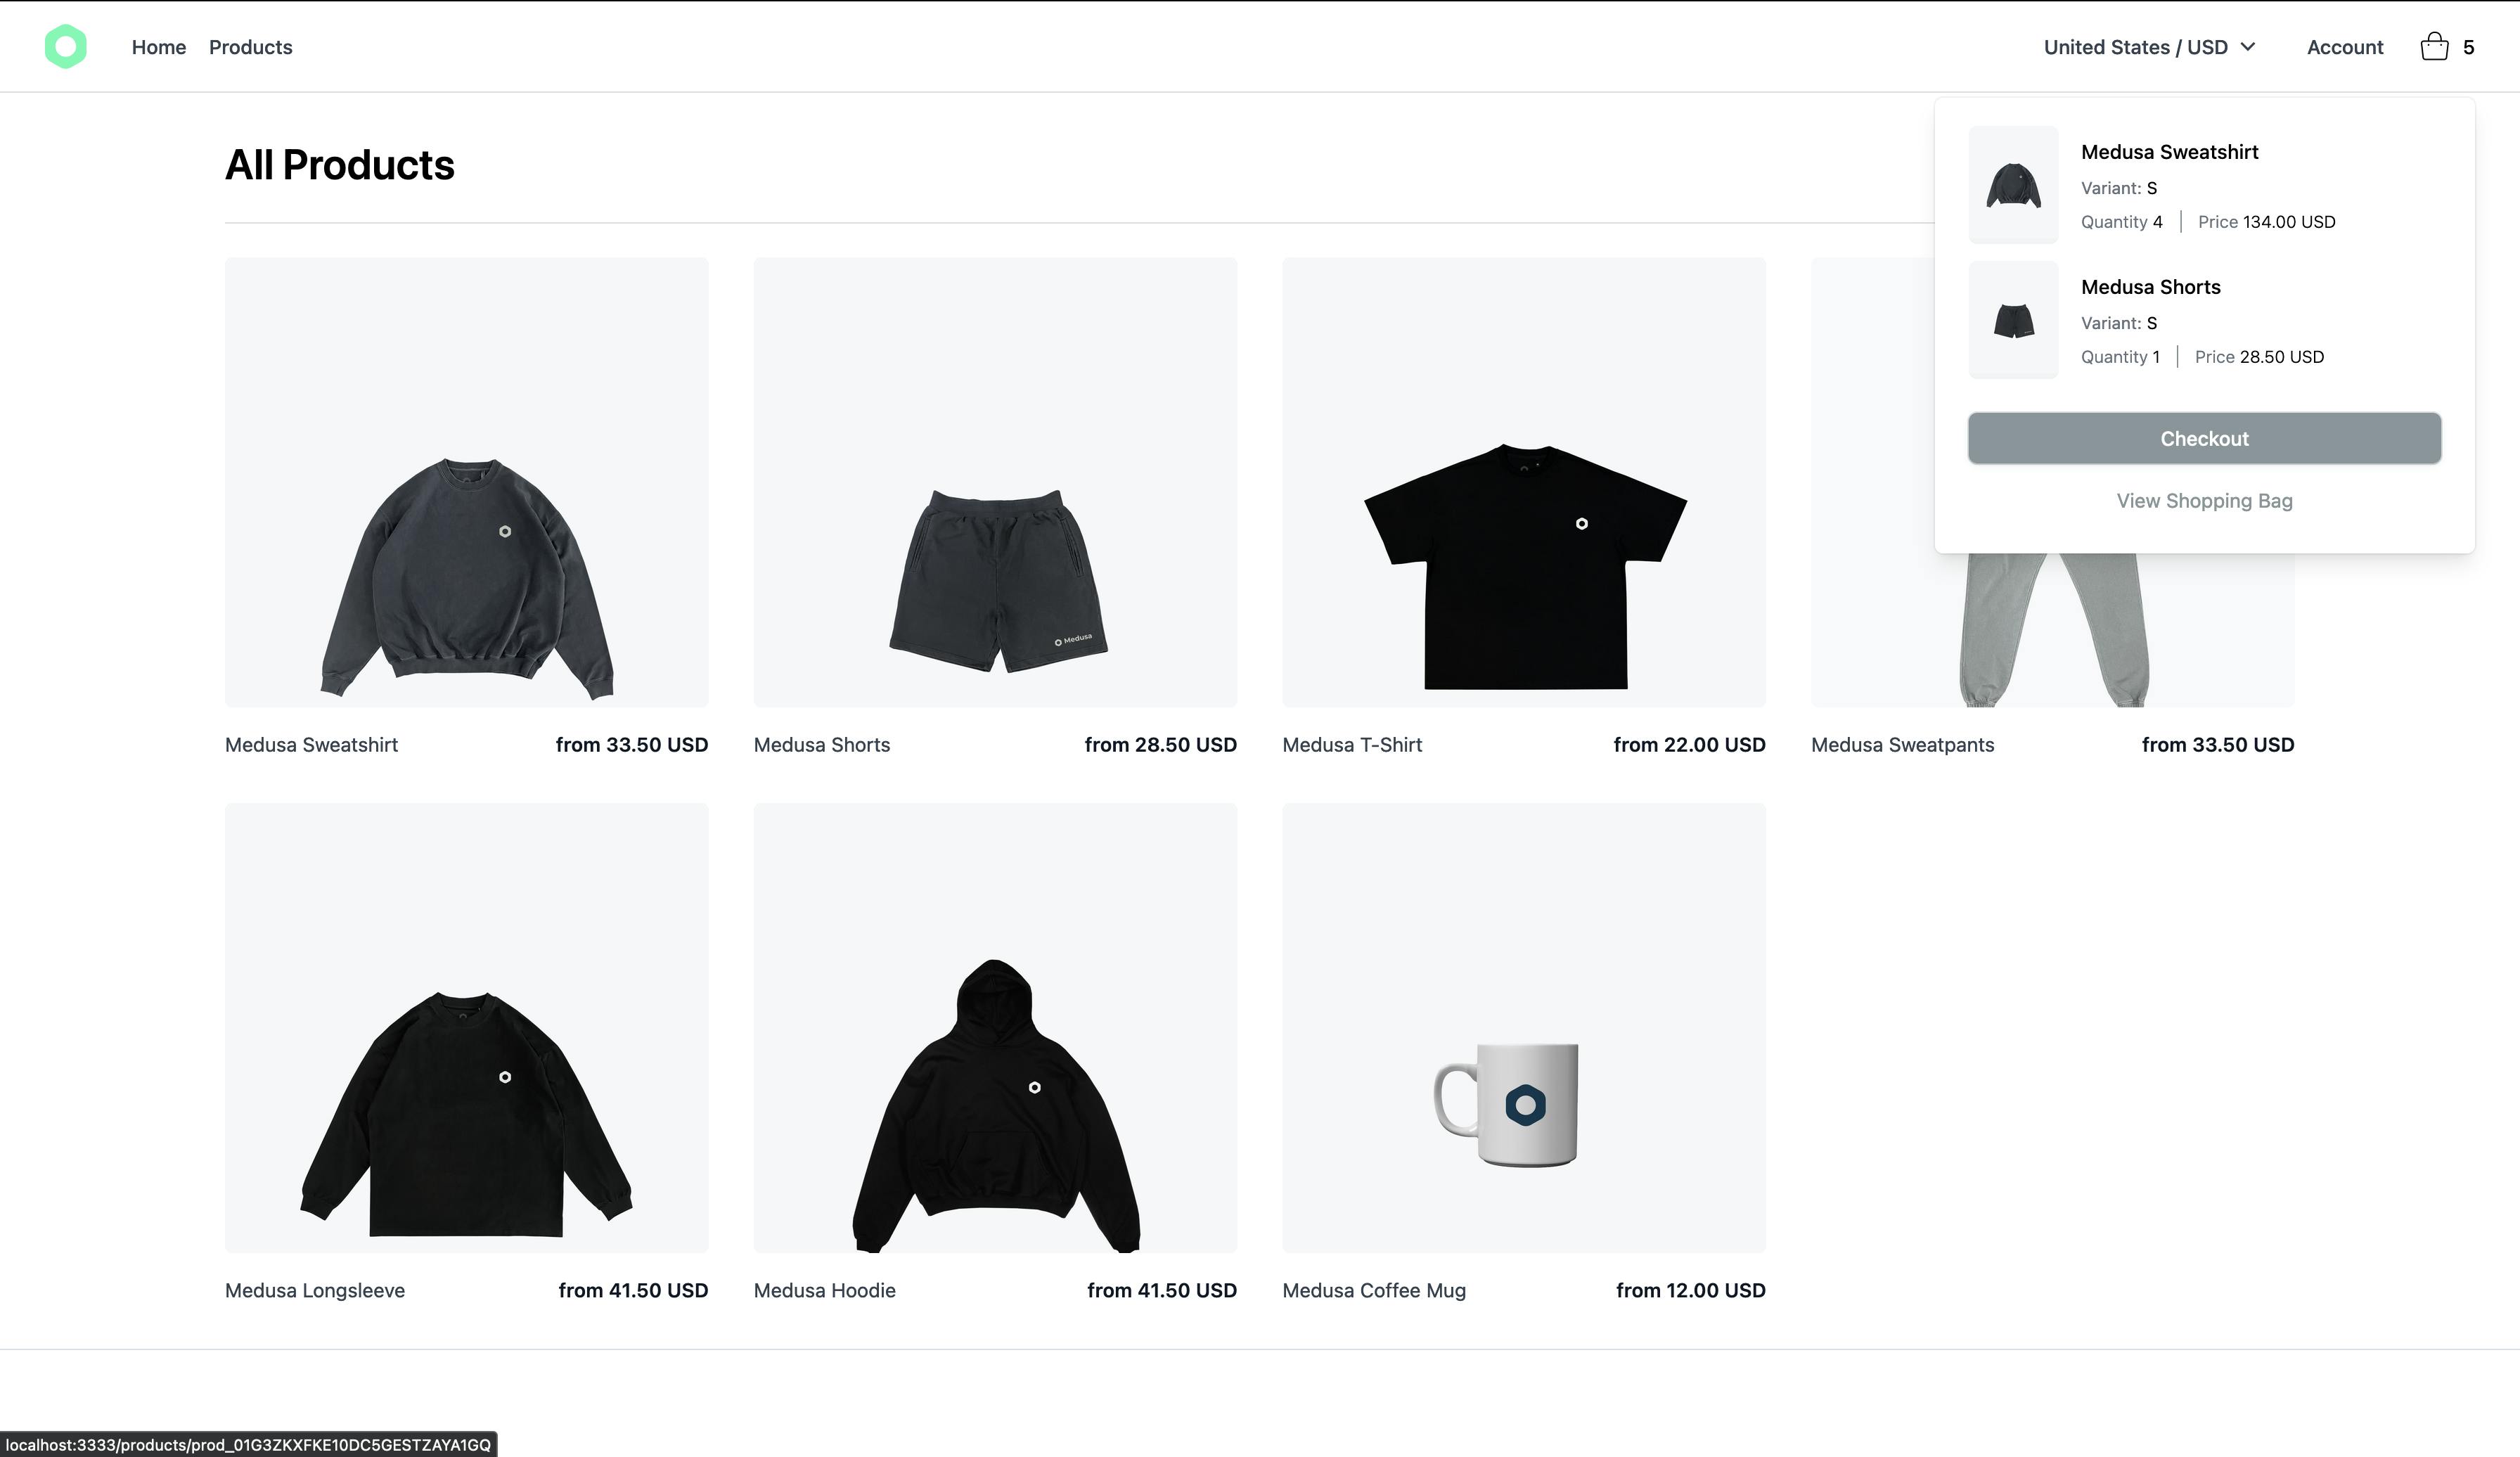
Within this component, you show how many products there are in the cart. When the customer clicks on the bag icon in the navigation bar, a summary of products in the cart is rendered using the CartPopoverItem component.
Also, 2 buttons View Shopping Bag and Checkout are rendered.
The list of items is retrieved using the mapGetters helper that maps to the cart/items getter created in the cart store.
To see both components in action you need to add them to the Navigation bar.
Open components/App/Navbar.vue and replace the current static shopping bag button with the <dropdowns-cart-popover /> just after the account button:
<div class="flex items-center justify-end">
  <div class="hidden lg:flex">
    <dropdowns-regions />

    <div class="relative inline-block text-left">
      <div>
        <button
          class="inline-flex justify-center w-full px-4 py-2 text-sm font-medium text-gray-700 hover:text-gray-600"
          type="button"
        >
          Account
        </button>
      </div>
    </div>
  </div>

    <!-- ADD HERE -->
  <dropdowns-cart-popover />
</div>
Test the Cart Popover
To test the cart popover, go back to your storefront and try clicking on the bag icon in the navigation bar. You should see the products that are currently in the cart.
In the next section, you will implement the cartpage that will allow you to modify the items’ quantities or remove items from the cart.
Cart page
This page has two components on it. The first one is the products list and the second is a summary of the cart totals.
To implement the first component, create the file components/ShoppingBag/CartItem.vue with the following content:
<template>
<div class="flex mb-6 last:mb-0">
<div class="bg-ui rounded-md overflow-hidden mr-4 max-w-1/4">
<img
class="h-auto w-full object-cover"
:src="item.thumbnail"
:alt="item.title"
>
</div>
<div class="flex text-sm flex-grow py-2">
<div class="flex flex-col justify-between w-full flex-grow">
<div class="flex flex-col">
<p class="font-semibold mb-2">
{{ item.title }}
</p>
<p class="lg:block mb-4 hidden font-light">
{{ item.variant.product.description }}
</p>
<p>
<span class="text-ui-dark">Variant:</span> {{ item.description }}
</p>
</div>
<p class="font-semibold">
{{ formatPrice(item.unit_price, cartCurrencyCode, item.quantity) }}
</p>
</div>
<div class="flex flex-col justify-between">
<div class="flex justify-end w-full">
<button @click="deleteItem">
×
</button>
</div>
<quantity-selector
:quantity="item.quantity"
@increment="updateQuantity"
@decrement="updateQuantity"
/>
</div>
</div>
</div>
</template>
<script>
import { formatPrice } from '~/utils/format-price'
export default {
name: 'CartItem',
props: {
item: {
type: Object,
default () {
return {}
}
}
},
computed: {
cartCurrencyCode () {
return this.$store.state.cart.cart.region.currency_code
}
},
methods: {
formatPrice,
updateQuantity (quantity) {
this.$store.dispatch('cart/updateQuantity', { id: this.item.id, quantity })
},
deleteItem () {
this.$store.dispatch('cart/removeItem', this.item.id)
}
}
}
</script>
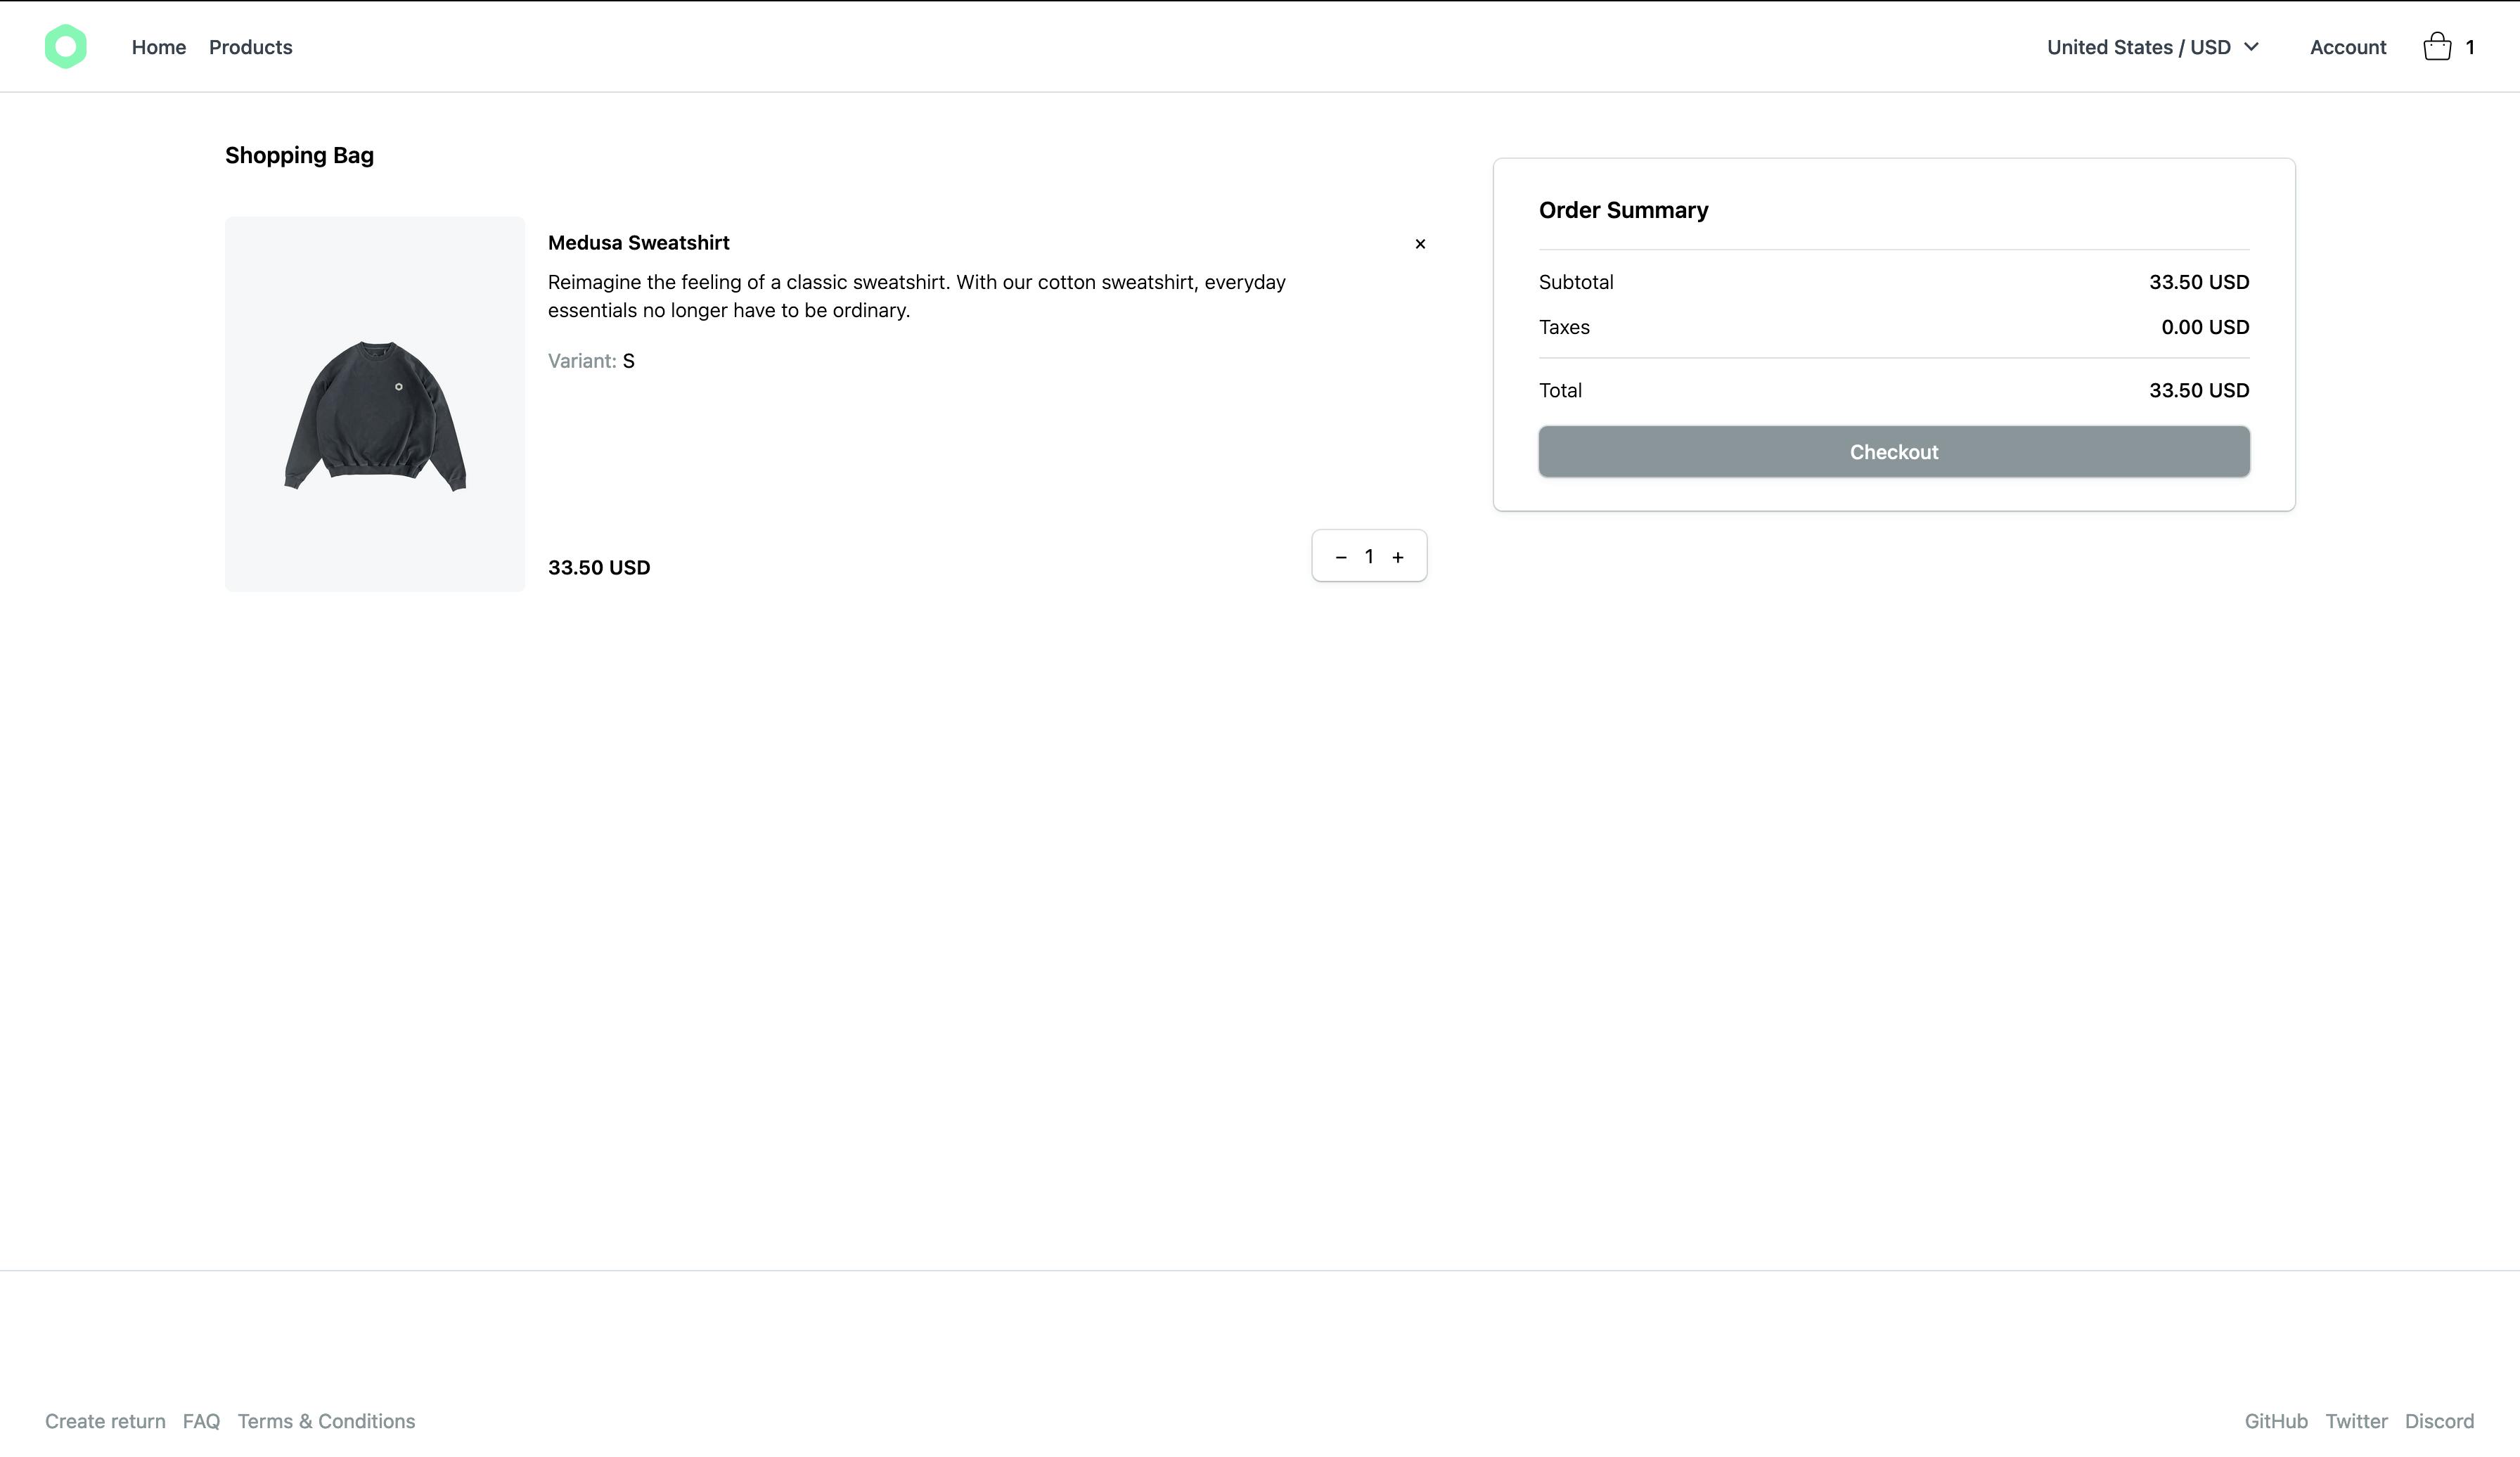
Using this component you can render all the products in the cart.
The <quantity-selector /> component is responsible for updating the product’s quantity. It calls the updateQuantity function which dispatches the cart/updateQuantity action in the cart store. Then, this action sends a request to your Medusa server to update the item quantity.
The delete button removes the item from the cart.
To implement the cart totals component, create the file components/ShoppingBag/CartReview.vue with the following content:
<template>
  <div class="bg-white rounded-md shadow px-8 py-6 w-full sticky top-28">
    <h3 class="font-semibold mb-4">
      Order Summary
    </h3>

    <div class="my-4 border-t bt-gray-100">
      <div class="font-light text-sm space-y-3 mt-3">
        <div class="flex items-center justify-between mb-2">
          <p>Subtotal</p>
          <p class="font-medium">
            {{ formatPrice(cart.subtotal, currencyCode ) }}
          </p>
        </div>

        <div v-if="shippingTotal" class="flex items-center justify-between mb-2">
          <p>Shipping</p>
          <p class="font-medium">
            {{ formatPrice(shippingTotal, currencyCode) }}
          </p>
        </div>

        <div class="flex items-center justify-between mb-2">
          <p>Taxes</p>
          <p class="font-medium">
            {{ formatPrice(cart.tax_total, currencyCode) }}
          </p>
        </div>

        <div class="h-px w-full bg-ui-medium mb-2" />

        <div class="flex items-center justify-between">
          <p>Total</p>
          <p class="font-medium">
            {{ formatPrice(cart.total, currencyCode) }}
          </p>
        </div>
      </div>
    </div>

    <div>
      <button class="btn-ui w-full">
        Checkout
      </button>
    </div>
  </div>
</template>

<script>
import { formatPrice } from '@/utils/format-price'

export default {
  computed: {
    cart () {
      return this.$store.state.cart.cart
    },
    currencyCode () {
      return this.cart.region.currency_code
    },
    shippingTotal () {
      return this.cart.shipping_total || 0
    }
  },
  methods: {
    formatPrice
  }
}
</script>
This component shows the cart’s totals including the subtotal, the shipping total (if the cart has this info), the taxes amount, and the total for all the products on the cart.
Now that you are done with the components you can create the Cart page.
Create the file pages/shopping-bag/index.vue with the following content:
<template>
  <div class="container mx-auto p-8">
    <div class="flex relative flex-col-reverse lg:flex-row">
      <div class="flex flex-col lg:mr-12 lg:w-3/5">
        <div class="mb-8">
          <h1 class="font-semibold">
            Shopping Bag
          </h1>
        </div>
        <div class="w-full">
          <shopping-bag-cart-item
            v-for="item in items"
            :key="item.id"
            :item="item"
          />
        </div>
      </div>
      <div class="relative w-full mb-8 lg:mb-0 lg:w-2/5">
        <shopping-bag-cart-review />
      </div>
    </div>
  </div>
</template>

<script>
import { mapGetters } from 'vuex'

export default {
  name: 'ShoppingBag',
  computed: {
    ...mapGetters({ items: 'cart/items' })
  }
}
</script>
The heaviest work was already implemented in the components created previously, so on this page you are just using them.
You retrieve the items in the cart using the mapGetters helper. Then, the <shopping-bag-cart-item /> component loops through all the items and renders them.
The <shopping-bag-cart-review /> component shows a review of the cart totals.
Test Cart Page
Go to your storefront product page and click on the bag icon in the navigation bar. Then, click on the View shopping bag button. You will be redirected to the cart page.
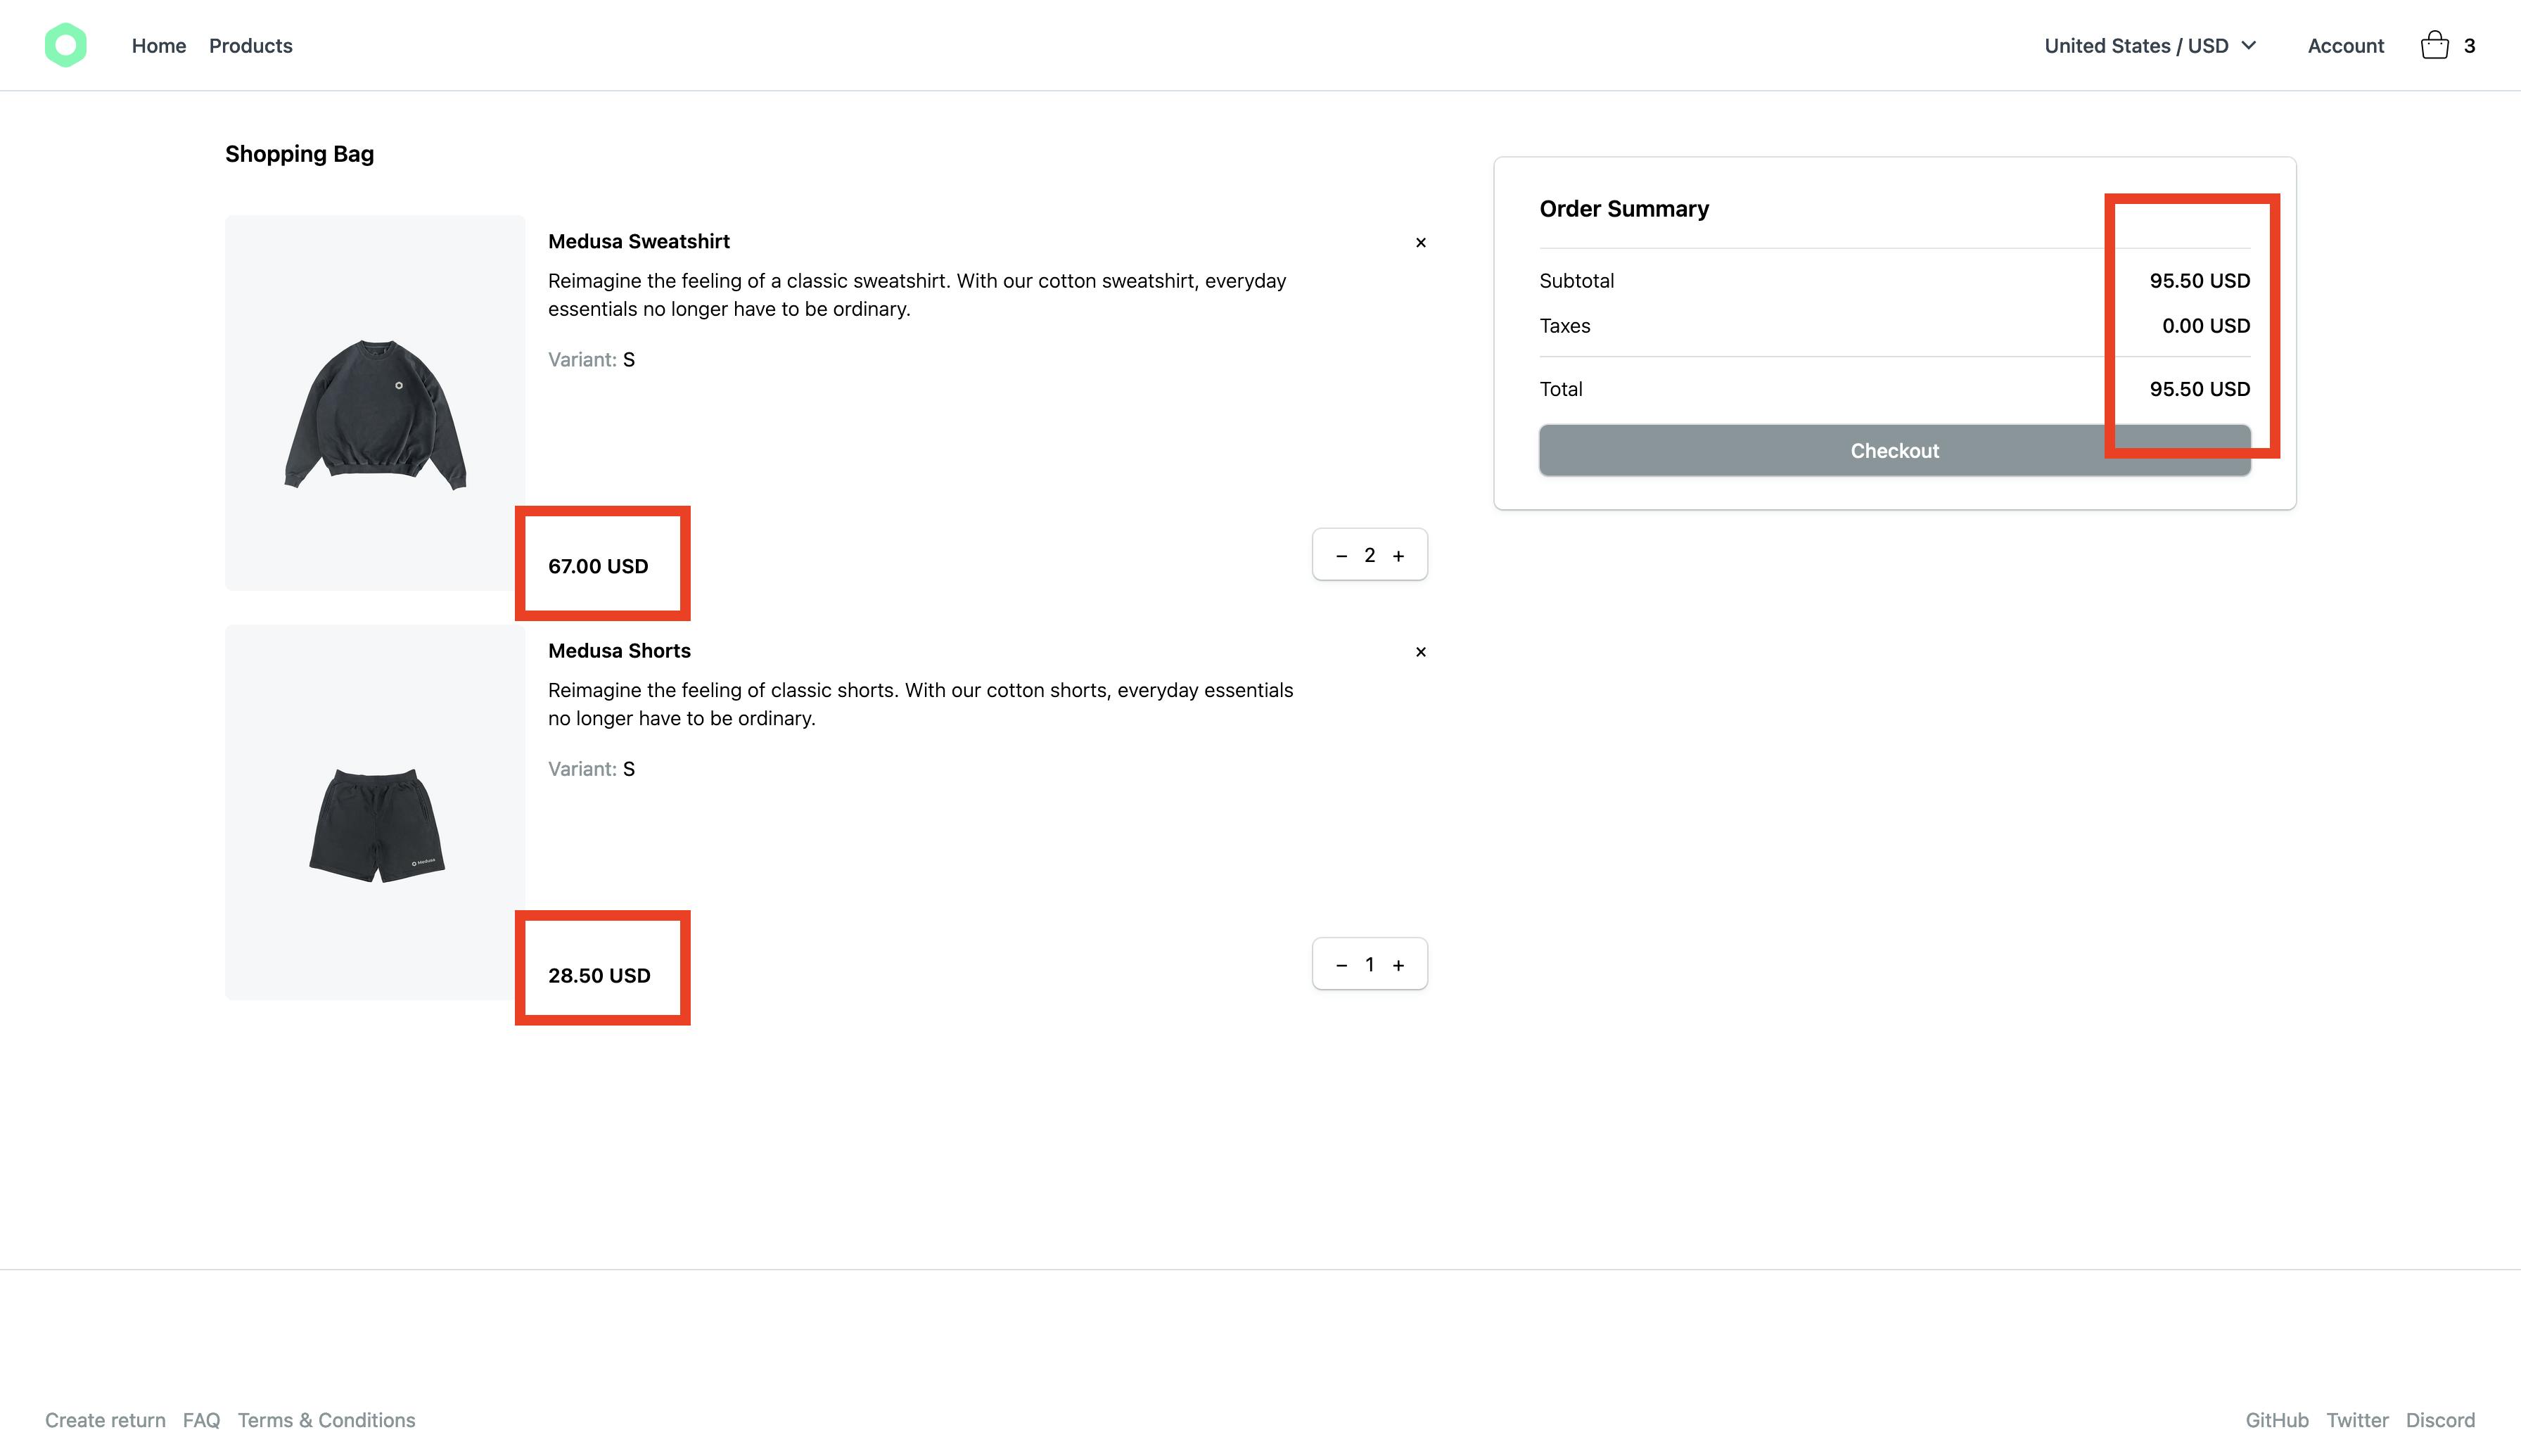
As you can see the prices on the card items are in sync with the totals in the cart totals summary.
Try testing the different functionalities you added including changing the quantity or deleting an item. It all should work as expected.
What’s Next?
The next part of this series covers adding the checkout flow to place an order. It also covers adding Stripe as a payment method.
You can refer to the following resources to implement additional features in your Nuxt.js ecommerce storefront:
- Set up Stripe as a payment method using the Stripe Plugin.
- Add customer login and profile to give customers a way to manage their data.
- Add a product search engine to your storefront using the Algolia plugin.
If you have any issues or questions related to Medusa, feel free to reach out to the Medusa team via Discord.