


Medusa is currently hosting a Hackathon where developers can create amazing projects with Medusa and win prizes and swag. An example of a Hackathon project is building an ecommerce app with React Native, which is covered in this article.
This is part 2 of Creating a React Native ecommerce App with Medusa series. In the previous article, you learned how to set up the Medusa server and admin, and how to create a basic ecommerce app.
In this part, you will learn how to implement cart and checkout functionalities. You can also find the source code of the React Native app on GitHub.
Prerequisites
- You need a Stripe account, you can signup here.
Clone the Starter Code
If you skipped part 1, you can clone the code from GitHub. To do that, simply run the below command:
git clone -b part-1 https://github.com/suhailkakar/react-native-medusajs
Once you have cloned the repository, move to the newly-created directory, react-native-medusajs, by running cd react-native-medusajs. Run the below command to install the node modules:
yarn install
The above command will install the necessary packages and dependencies from the NPM registry.
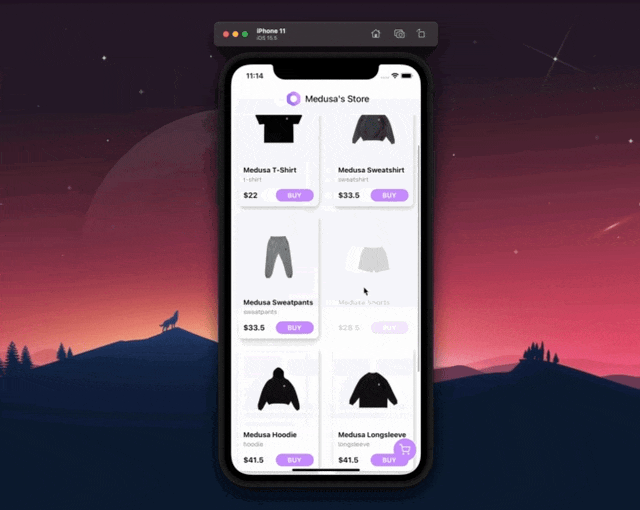
After the dependencies are installed successfully, run expo start to start the application. You can either scan the QR code using your device or run the app on an Android/iOS simulator. You should see a similar screen once the app is opened on your device/emulator.
Make sure that the Medusa server is running as well.
You might need to modify the URL in constants/urls.js if you can't see the products. You can update the base URL to the IP address where the backend server is running.
Creating the Cart
The first step is to implement the cart functionality. Install async-storage to save the cart id in the device’s local storage. Run the below command to install @react-native-async-storage/async-storage in the project:
expo install @react-native-async-storage/async-storage
Once the package is installed, open the project in any code editor and paste the below code into App.js before the return function:
const getCartId = () => {
    axios.post(`${baseURL}/store/carts`).then((res) => {
      AsyncStorage.setItem("cart_id", res.data.cart.id);
    });
  };
In the above code, you created a function named getCartId and inside of that function, you are querying the backend API to get a cart id using Axios and then saving it in the device’s local storage using async-storage.
Make sure to import async-storage, useEffect, Axios and baseURL in the
App.jsfile:
import axios from "axios";
import baseURL from "./constants/url";
import { useEffect } from "react";
import AsyncStorage from "@react-native-async-storage/async-storage";
The above function (getCartId) will not run since you didn’t call it yet. However, you want to run this function only if there is no cart id saved in the device’s local storage.
Now, write another function to check if there’s already a cart id in the device’s local storage. If there isn’t, the function should call getCartId. Lastly, call the checkCartId inside of useEffect:
// Check cart_id
  const checkCartId = async () => {
    const cartId = await AsyncStorage.getItem("cart_id");
    if (!cartId) {
      getCartId();
    }
  };

useEffect(() => {
    checkCartId();
}, []);
Adding Products to the Cart
First, let’s update the button component and add a prop to update the button layout based on the size provided. You can replace the code inside components/Button.js with the code below:
import { View, Text, StyleSheet } from "react-native";
import React from "react";
import { widthToDp } from "rn-responsive-screen";

export default function Button({ title, onPress, style, textSize, large }) {
  return (
    <View style={[styles.container, style, large && styles.large]}>
      <Text
        style={[
          styles.text,
          { fontSize: textSize ? textSize : widthToDp(3.5) },
          ,
        ]}
        onPress={onPress}
      >
        {title}
      </Text>
    </View>
  );
}

const styles = StyleSheet.create({
  container: {
    backgroundColor: "#C37AFF",
    padding: 5,
    width: widthToDp(20),
    alignItems: "center",
    justifyContent: "center",
    borderRadius: 59,
  },
  large: {
    width: "100%",
    marginTop: 10,
    height: widthToDp(12),
  },
  text: {
    color: "#fff",
    fontWeight: "bold",
  },
});
Recall that by the end of Part 1, you have created a component at components/ProductInfo/MetaInfo.js to display the description, size, and other information about the product. Go ahead and add a button component after the description:
<Button title="Add to Cart" onPress={addToCart} large={true} />
Also, make sure to import the button component from components/Button:
import Button from "../Button";
As you can see, you are calling addToCart function when the user presses the button, so declare that function.
On top of MetaInfo.js component before return, declare a new function named addToCart and add the below code inside of it:
const addToCart = async () => {
    const cartId = await AsyncStorage.getItem("cart_id");
    axios
      .post(`${baseURL}/store/carts/${cartId}/line-items`, {
        variant_id: product.variants[0].id,
        quantity: 1,
      })
      .then(({ data }) => {
        alert(`Item ${product.title} added to cart`);
      })
      .catch((err) => {
        console.log(err);
      });
  };
In the above code, first, you are fetching the cart_id from async storage and then posting the product’s first variant with 1 quantity to the cart API. Next, you are navigating users to the cart screen.
You also need to import AsyncStorage, axios and baseURL in the MetaInfo.js file:
import axios from "axios";
import baseURL from "../../constants/url";
import AsyncStorage from "@react-native-async-storage/async-storage";
Cart Screen
This is the screen where the user will see the products they added to the cart. Create a new file named screens/Cart.js and use it to render a simple Text component for now:
import { View, Text } from "react-native";
import React from "react";

export default function Cart() {
  return (
    <View>
      <Text>Cart Screen</Text>
    </View>
  );
}
Then, import the cart screen at the top of App.js:
import Cart from "./screens/Cart";
Add a new Scene component below the existing Scene component in the returned JSX:
<Scene key="cart" component={Cart} hideNavBar />
In the components directory, create a new file named CartItem.js and add the following content:
import { View, Text, StyleSheet, Image } from "react-native";
import React from "react";
import { heightToDp, width, widthToDp } from "rn-responsive-screen";

export default function CartItem({ product }) {
  return (
    <View style={styles.container}>
      <Image source={{ uri: product.thumbnail }} style={styles.image} />
      <View style={styles.info}>
        <View>
          <Text style={styles.title}>{product.title}</Text>
          <Text style={styles.description}>
            {product.description} • ${product.unit_price / 100}
          </Text>
        </View>
        <View style={styles.footer}>
          <Text style={styles.price}>${product.total / 100}</Text>
          <Text style={styles.quantity}>x{product.quantity}</Text>
        </View>
      </View>
    </View>
  );
}

const styles = StyleSheet.create({
  container: {
    marginTop: 20,
    flexDirection: "row",
    borderBottomWidth: 1,
    paddingBottom: 10,
    borderColor: "#e6e6e6",
    width: widthToDp("90%"),
  },
  image: {
    width: widthToDp(30),
    height: heightToDp(30),
    borderRadius: 10,
  },
  title: {
    fontSize: widthToDp(4),
    fontWeight: "bold",
  },
  footer: {
    flexDirection: "row",
    justifyContent: "space-between",
  },
  info: {
    marginLeft: widthToDp(3),
    flexDirection: "column",
    justifyContent: "space-between",
    marginVertical: heightToDp(2),
    width: widthToDp(50),
  },
  description: {
    fontSize: widthToDp(3.5),
    color: "#8e8e93",
    marginTop: heightToDp(2),
  },

  price: {
    fontSize: widthToDp(4),
  },
  quantity: {
    fontSize: widthToDp(4),
  },
});
The above code is a simple React Native cart component which will be rendered on the cart screen. You are passing the props to the component from the parent component. This is the component that will represent an item in the cart.
Next, in the screens/Cart.js file, add the below function and useState before the return statement to fetch the products from the cart API and store them in the state:
const [cart, setCart] = useState([]);

  const fetchCart = async () => {
    // Get the cart id from the device storage
    const cartId = await AsyncStorage.getItem("cart_id");
    // Fetch the products from the cart API using the cart id
    axios.get(`${baseURL}/store/carts/${cartId}`).then(({ data }) => {
      // Set the cart state to the products in the cart
      setCart(data.cart);
    });
  };

  useEffect(() => {
        // Calling the fetchCart function when the component mounts
    fetchCart();
  }, []);
In the above code, you are getting the cart id from the device storage, fetching the products from the cart API and saving the data to the state. Next, you are calling the function inside of useEffect. Replace the import at the top of the screens/Cart.js file with the code below:
import { View, Text, StyleSheet } from "react-native";
import React, { useEffect, useState } from "react";
import Header from "../components/Header";
import axios from "axios";
import baseURL from "../constants/url";
import CartItem from "../components/CartItem";
import { ScrollView } from "react-native-gesture-handler";
import { SafeAreaView } from "react-native-safe-area-context";
import { width, widthToDp } from "rn-responsive-screen";
import Button from "../components/Button";
import { Actions } from "react-native-router-flux";
import AsyncStorage from "@react-native-async-storage/async-storage";
Now that you have fetched the data and saved it to the state, it's time to render the products on the cart screen. Replace everything below useEffect function with the below code:
return (
    // SafeAreaView is used to avoid the notch on the phone
    <SafeAreaView style={[styles.container]}>
      {/* SchrollView is used in order to scroll the content */}
      <ScrollView contentContainerStyle={styles.container}>
        {/* Using the reusable header component */}
        <Header title="My Cart" />

        {/* Mapping the products into the Cart component */}
        {cart?.items?.map((product) => (
          <CartItem product={product} />
        ))}
      </ScrollView>
      {/* Creating a seperate view to show the total amount and checkout button */}
      <View>
        <View style={styles.row}>
          <Text style={styles.cartTotalText}>Items</Text>

          {/* Showing Cart Total */}
          <Text
            style={[
              styles.cartTotalText,
              {
                color: "#4C4C4C",
              },
            ]}
          >
            {/* Dividing the total by 100 because Medusa doesn't store numbers in decimal */}
            ${cart?.total / 100}
          </Text>
        </View>
        <View style={styles.row}>
          {/* Showing the discount (if any) */}
          <Text style={styles.cartTotalText}>Discount</Text>
          <Text
            style={[
              styles.cartTotalText,
              {
                color: "#4C4C4C",
              },
            ]}
          >
            - ${cart?.discount_total / 100}
          </Text>
        </View>
        <View style={[styles.row, styles.total]}>
          <Text style={styles.cartTotalText}>Total</Text>
          <Text
            style={[
              styles.cartTotalText,
              {
                color: "#4C4C4C",
              },
            ]}
          >
            {/* Calculating the total */}$
            {cart?.total / 100 - cart?.discount_total / 100}
          </Text>
        </View>
        <View>
          {/* A button to navigate to checkout screen */}
          <Button
            large={true}
            onPress={() => {
              Actions.checkout({
                cart,
              });
            }}
            title={cart?.items?.length > 0 ? "Checkout" : "Empty Cart"}
          />
        </View>
      </View>
    </SafeAreaView>
  );
}

// Styles....
const styles = StyleSheet.create({
  container: {
    flex: 1,
    backgroundColor: "#fff",
    alignItems: "center",
  },
  row: {
    flexDirection: "row",
    justifyContent: "space-between",
    width: widthToDp(90),
    marginTop: 10,
  },
  total: {
    borderTopWidth: 1,
    paddingTop: 10,
    borderTopColor: "#E5E5E5",
    marginBottom: 10,
  },
  cartTotalText: {
    fontSize: widthToDp(4.5),
    color: "#989899",
  },
});
Next, you’ll add a basic and simple button component in the screens/Products.js in order to navigate to the cart screen.
Add the below code after the ScrollView component in the screens/Products.js screen:
<View style={styles.addToCart}>
        <Feather
          name="shopping-cart"
          size={24}
          color="white"
          onPress={() => Actions.cart()}
        />
      </View>
Make sure to also add the style object inside StyleSheet.create function:
addToCart: {
    position: "absolute",
    bottom: 30,
    right: 10,
    backgroundColor: "#C37AFF",
    width: widthToDp(12),
    height: widthToDp(12),
    borderRadius: widthToDp(10),
    alignItems: "center",
    padding: widthToDp(2),
    justifyContent: "center",
  },
You also need to import the feather icons from @expo/vector-icons at the top of the file:
import { Feather } from "@expo/vector-icons";
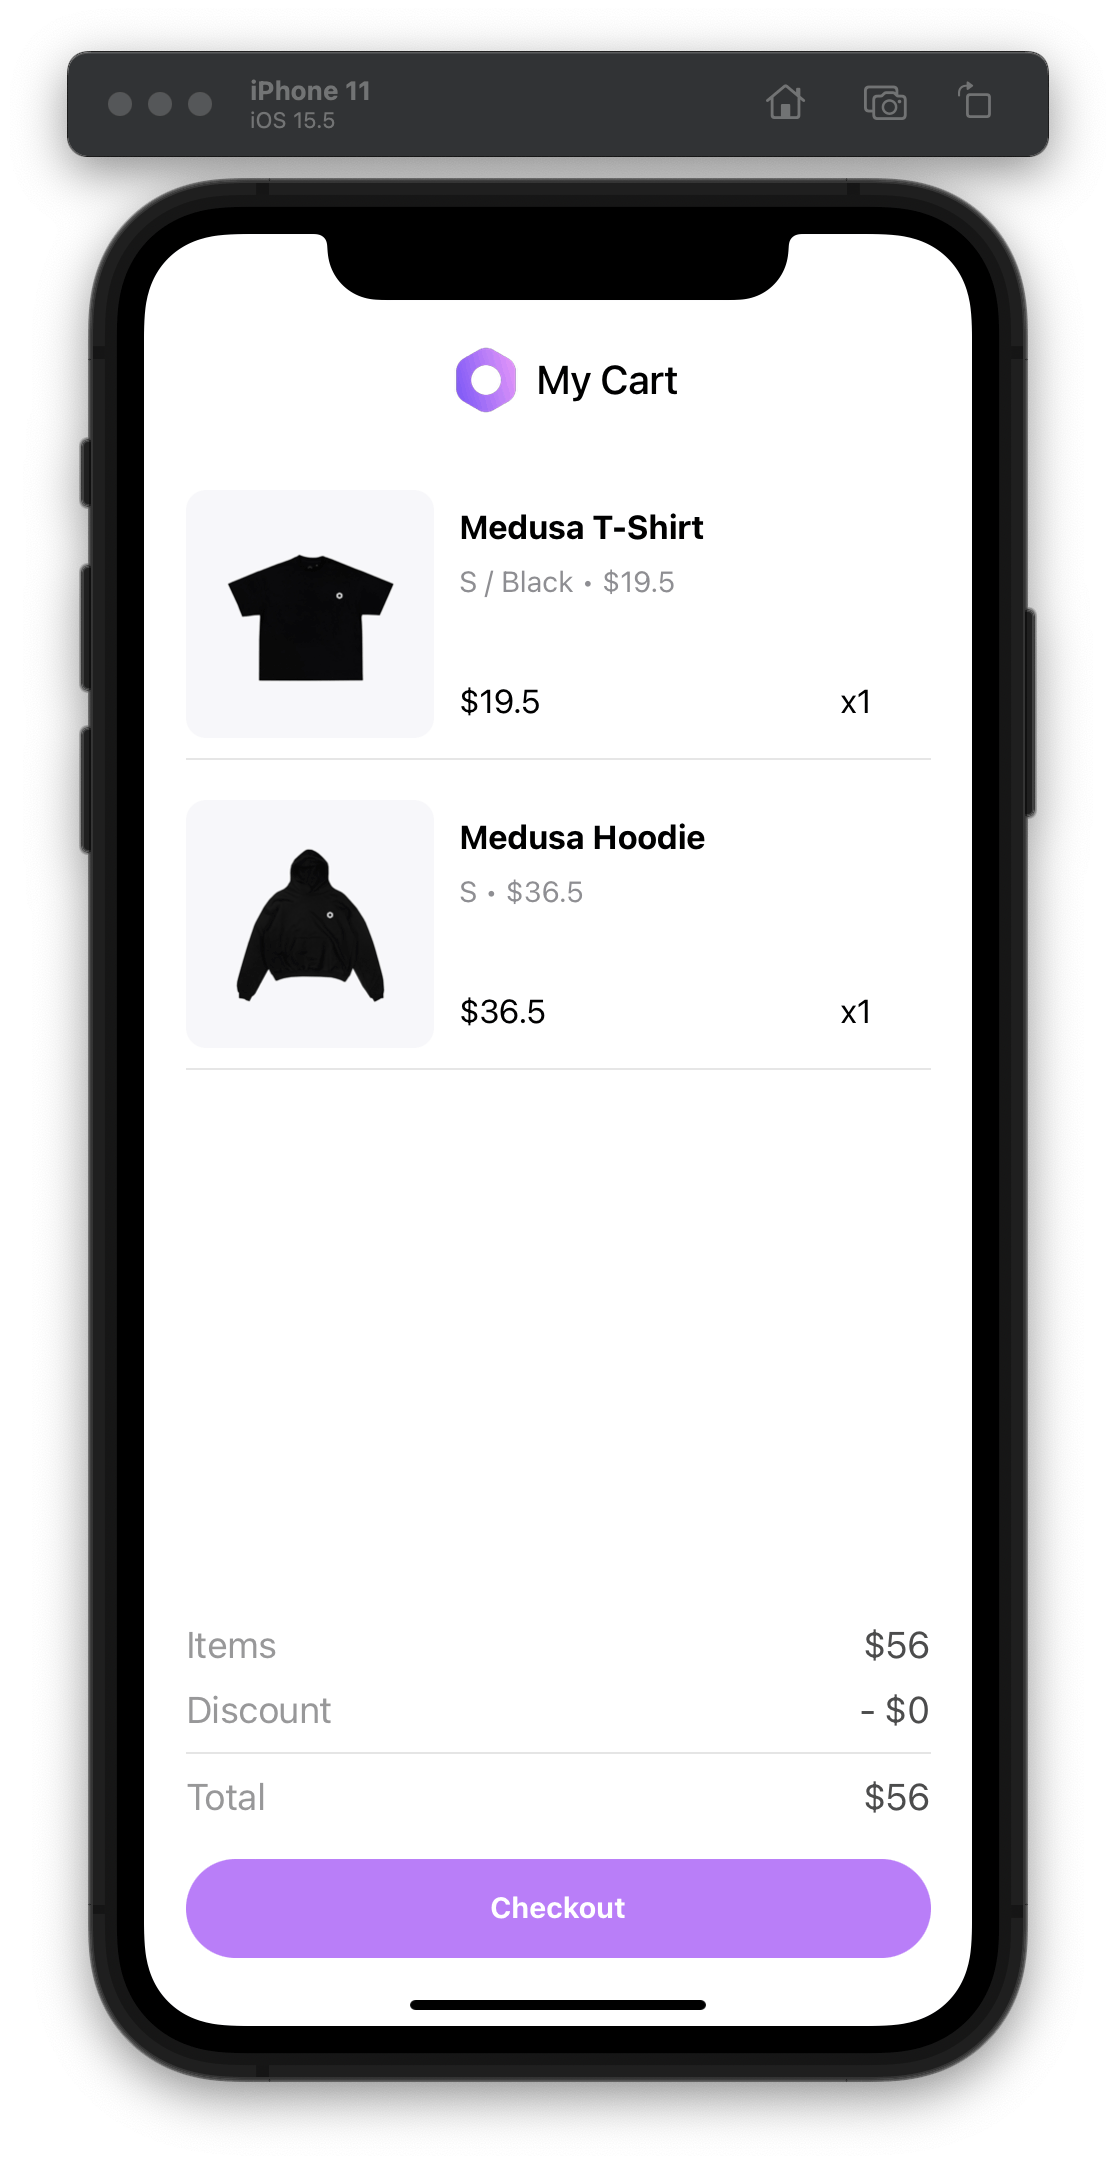
Test Cart Screen
The cart screen is ready. Make sure that the Medusa server is running, then re-run your React Native app.
Try adding a few products into the cart, and then view the cart. Your cart screen should look like this:
Checkout & Payment
Now that we have completed the cart flow, it is time for checkout flow.
Configure the Stripe Plugin
Navigate to the Medusa server directory and install the Stripe plugin by running the command below:
npm install medusa-payment-stripe
Add the following code at the end of the plugins array in the medusa-config.js.
const plugins = [
  ...,
  {
    resolve: `medusa-payment-stripe`,
    options: {
      api_key: process.env.STRIPE_API_KEY,
    },
  },
];
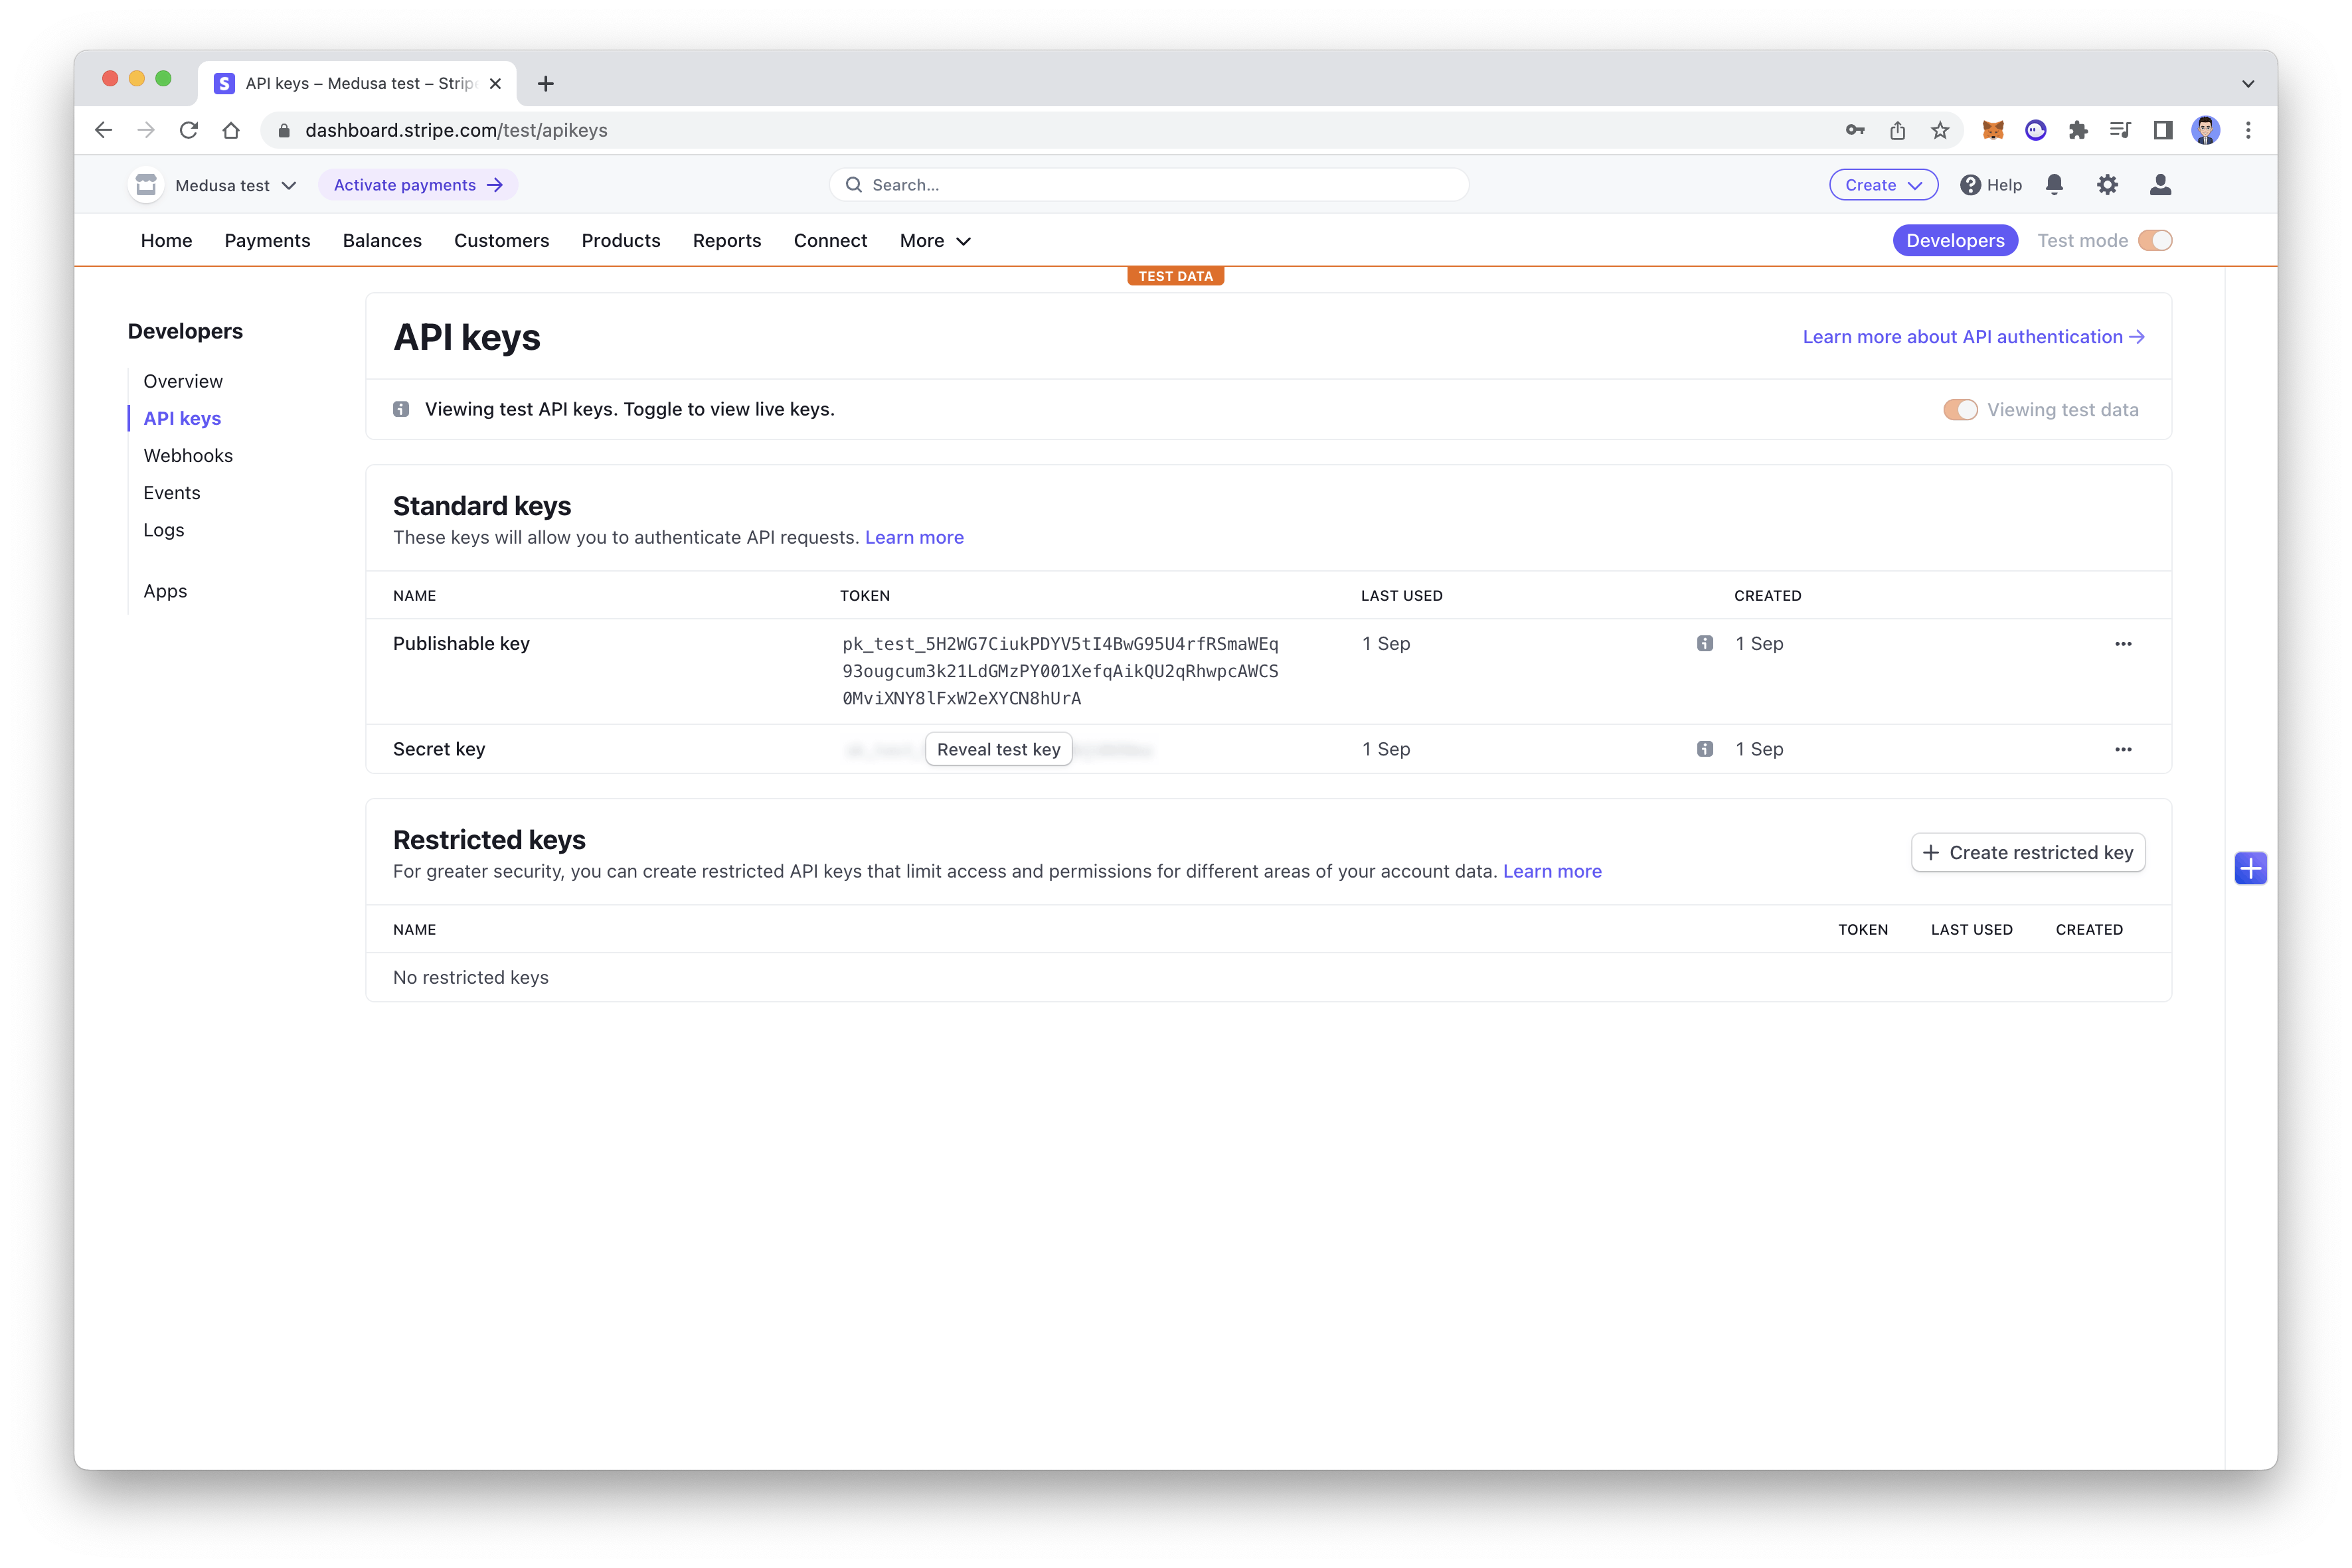
For this tutorial, I used Stripe to handle payments. Navigate to the Stripe dashboard and make sure to turn on the toggle button of Test Mode on the top right. Click the developers button beside the Test Mode. On the left, choose API key and you can find the Publishable key and Secret key. Copy the two keys, as you will need them later.
In the .env file, paste your secret key where is it written STRIPE_API_KEY.
Enable Stripe as a Payment Provider
Make sure that the Medusa server and admin panel is running. Now, open the Medusa admin panel and choose Settings from the Sidebar. Then, choose Regions.
Then, choose the regions you want to add Stripe as a payment provider. In the right-side settings, click on the three dots icon and choose “Edit Region Details”.
In the new window that opens, choose Stripe in the payment providers field. Once you’re done, click the save and close button.
Checkout Screen
Coming back to the React Native app, create a new file screens/Checkout.js and add a simple Text component to it:
import { View, Text } from "react-native";
import React from "react";

export default function Checkout() {
  return (
    <View>
      <Text>Checkout</Text>
    </View>
  );
}
Then, import the checkout screen at the top of App.js:
import Checkout from "./screens/Checkout";
Add a new Scene component below the existing Scene components in the returned JSX:
<Scene key="checkout" component={Checkout} hideNavBar />
In the components folder, create a new file named ShippingAddress.js and you can add the following code to it:
// Importing a few package and components
import { View, StyleSheet, Text, TextInput } from "react-native";
import React, { useState } from "react";
import { heightToDp } from "rn-responsive-screen";

export default function ShippingAddress({ onChange }) {
  // Passing onChange as a prop

  // Declaring a few states to store the user's input
  const [firstName, setFirstName] = useState("");
  const [lastName, setLastName] = useState("");
  const [AddressLine1, setAddressLine1] = useState("");
  const [AddressLine2, setAddressLine2] = useState("");
  const [city, setCity] = useState("");
  const [country, setCountry] = useState("");
  const [province, setProvince] = useState("");
  const [postalCode, setPostalCode] = useState("");
  const [phone, setPhone] = useState("");
  const [company, setCompany] = useState("");
  const [email, setEmail] = useState("");

  // Function to handle the user's input
  const handleChange = () => {
    // Creating an object to store the user's input
    let address = {
      first_name: firstName,
      last_name: lastName,
            email,
      address_1: AddressLine1,
      address_2: AddressLine2,
      city,
      province,
      postal_code: postalCode,
      phone,
      company,
            country
    };
    // Calling the onChange function and passing the address object as an argument
    onChange(address);
  };

  return (
    // Creating a view to hold the user's input
    <View style={styles.container}>
      {/* Creating a text input for the user's first name */}
      <TextInput
        onChangeText={(e) => {
          // Setting the user's input to the firstName state
          setFirstName(e);
          // Calling the handleChange function
          handleChange();
        }}
        placeholder="First Name"
        style={styles.input}
      />
      <TextInput
        onChangeText={(e) => {
          setLastName(e);
          handleChange();
        }}
        placeholder="Last Name"
        style={styles.input}
      />
         <TextInput
        onChangeText={(e) => {
          setEmail(e);
          handleChange();
        }}
        placeholder="Email"
        style={styles.input}
      />
      <TextInput
        onChangeText={(e) => {
          setAddressLine1(e);
          handleChange();
        }}
        placeholder="Address Line 1"
        style={styles.input}
      />
      <TextInput
        onChangeText={(e) => {
          setAddressLine2(e);
          handleChange();
        }}
        placeholder="Address Line 2"
        style={styles.input}
      />
      <TextInput
        onChangeText={(e) => {
          setCity(e);
          handleChange();
        }}
        placeholder="City"
        style={styles.input}
      />
      <TextInput
        onChangeText={(e) => {
          setCountry(e);
          handleChange();
        }}
        placeholder="Country"
        style={styles.input}
      />
      <TextInput
        onChangeText={(e) => {
          setProvince(e);
          handleChange();
        }}
        placeholder="Province"
        style={styles.input}
      />
      <TextInput
        onChangeText={(e) => {
          setPostalCode(e);
          handleChange();
        }}
        placeholder="Postal Code"
        style={styles.input}
      />
      <TextInput
        onChangeText={(e) => {
          setPhone(e);
          handleChange();
        }}
        placeholder="Phone"
        style={styles.input}
      />
      <TextInput
        onChangeText={(e) => {
          setCompany(e);
          handleChange();
        }}
        placeholder="Company"
        style={styles.input}
      />
    </View>
  );
}

// Creating a stylesheet to style the view
const styles = StyleSheet.create({
  container: {
    marginTop: heightToDp(2),
  },
  input: {
    borderWidth: 1,
    padding: 12,
    borderColor: "#E5E5E5",
    borderRadius: 5,
    marginTop: 10.2,
  },
});
In the above code, you imported a few components and created a function that handles the onChange event for the inputs. You have also created a few TextInputs for the shipping address.
Create a new file named RadioButton.js in the components folder and add the below code to it. It is a very simple component that will render radio buttons:
import { View, Text, StyleSheet, TouchableOpacity } from "react-native";
import React from "react";

const RadioButton = ({ onPress, selected, children }) => {
  return (
    <View style={styles.radioButtonContainer}>
      <TouchableOpacity onPress={onPress} style={styles.radioButton}>
        {selected ? <View style={styles.radioButtonIcon} /> : null}
      </TouchableOpacity>
      <TouchableOpacity onPress={onPress}>
        <Text style={styles.radioButtonText}>{children}</Text>
      </TouchableOpacity>
    </View>
  );
};
const styles = StyleSheet.create({
  radioButtonContainer: {
    flexDirection: "row",
    alignItems: "center",
    marginRight: 45,
  },
  radioButton: {
    height: 20,
    width: 20,
    backgroundColor: "#F8F8F8",
    borderRadius: 10,
    borderWidth: 1,
    borderColor: "#E6E6E6",
    alignItems: "center",
    justifyContent: "center",
  },
  radioButtonIcon: {
    height: 14,
    width: 14,
    borderRadius: 7,
    backgroundColor: "#C37AFF",
  },
  radioButtonText: {
    fontSize: 16,
    marginLeft: 16,
  },
});
export default RadioButton;
Create another file named stripe.js in the constants folder and add the below code. Make sure to update the YOUR_STRIPE_PUBLISHABLE_KEY with your publishable key:
const publishable_key = "YOUR_STRIPE_PUBLISHABLE_KEY";

export { publishable_key };
Next, install the Stripe SDK for react native using the command below:
npm install @stripe/stripe-react-native
Now, update the checkout screen (screens/Checkout.js) by replacing the imports with the below components and dependencies:
import { View, Text, StyleSheet } from "react-native";
import React, { useEffect, useState } from "react";
import Header from "../components/Header";
import axios from "axios";
import baseURL from "../constants/url";
import { ScrollView } from "react-native-gesture-handler";
import { SafeAreaView } from "react-native-safe-area-context";
import { heightToDp, widthToDp } from "rn-responsive-screen";
import Button from "../components/Button";
import ShippingAddress from "../components/ShippingAddress";
import Payment from "../components/Payment";
import { publishable_key } from "../constants/stripe";
import RadioButton from "../components/RadioButton";
import { CardField, useStripe } from "@stripe/stripe-react-native";
import AsyncStorage from "@react-native-async-storage/async-storage";
import { StripeProvider } from "@stripe/stripe-react-native";
Next, create a few useStates that will be used to capture the input values in the Checkout component:
const [paymentInfo, setPaymentInfo] = useState({});
const [shippingAddress, setShippingAddress] = useState({});
const [shippingOptions, setShippingOptions] = useState([]);
const [selectedShippingOption, setSelectedShippingOption] = useState("");
const [paymentSession, setPaymentSession] = useState({});

const { confirmPayment } = useStripe();
Create two functions that will be used to capture the input values that we will declare later on.
// const [selectedShippingOption, setSelectedShippingOption] = useState("");
// ......

  const handlePaymentInputChange = (card) => {
    setPaymentInfo(card.values);
  };

  const handleAddressInputChange = (address) => {
    setShippingAddress(address);
  };
When the page opens and before the payment providers are displayed to the customer to choose from, you must initialize the payment sessions. To do that, we create a function named InitializePaymentSessions and call it on useEffect function. Here is what the code should look like:
const InitializePaymentSessions = async () => {
    // Getting cart id from async storage
    let cart_id = await AsyncStorage.getItem("cart_id");
    // Intializing payment session
    axios
      .post(`${baseURL}/store/carts/${cart_id}/payment-sessions`)
      .then(({ data }) => {
        axios
          .post(`${baseURL}/store/carts/${cart_id}/payment-session`, {
            provider_id: "stripe",
          })
          .then(({ data }) => {
            setPaymentSession(data.cart.payment_session);
          });
      });
  };

  useEffect(() => {
    // Calling the function to fetch the payment options when the component mounts
    fetchPaymentOption();
  }, []);
Next, create other functions to handle payment. Add the below functions the the Checkout.js :
const handlePayment = async () => {

        // Getting client secret from the payment session state
    const clientSecret = paymentSession.data ? paymentSession.data.client_secret : paymentSession.client_secret

    const billingDetails = {
      email: shippingAddress.email,
      phone: shippingAddress.phone,
      addressCity: shippingAddress.city,
      addressCountry: shippingAddress.country,
      addressLine1: shippingAddress.address_1,
      addressLine2: shippingAddress.address_2,
      addressPostalCode: shippingAddress.postalCode,
    };
    const { error, paymentIntent } = await confirmPayment(clientSecret, {
      type: "Card",
      billingDetails,
    });
        if (error) {
      alert("Payment failed", error);
    }
    if (paymentIntent) {
      alert("Payment successful");

// Calling the complete cart function to empty the cart and redirect to the home screen
    completeCart();
    }

  };

const completeCart = async () => {
    const cartId = await AsyncStorage.getItem("cart_id");

    // Sending a request to the server to empty the cart
    axios
      .post(`${baseURL}/store/carts/${cartId}/complete`)
      .then(async (res) => {
        // Removing the cart_id from the local storage
        await AsyncStorage.removeItem("cart_id");
        // Redirecting to the home screen
        Actions.push("products");
      });
  };

  // Calling the API when user presses the "Place Order" button
  const placeOrder = async () => {
    // Getting cart id from async storage
    let cart_id = await AsyncStorage.getItem("cart_id");
    // Post shipping address to server
    axios
      .post(`${baseURL}/store/carts/${cart_id}`, {
        shipping_address: shippingAddress,
      })
      .then(({ data }) => {
        // Post shipping method to server
        axios
          .post(`${baseURL}/store/carts/${cart_id}/shipping-methods`, {
            option_id: selectedShippingOption,
          })
          .then(({ data }) => {
            // Calling the handle Payment API
            handlePayment();
          });
      });
  };

  const fetchPaymentOption = async () => {
    // Getting cart id from async storage
    let cart_id = await AsyncStorage.getItem("cart_id");

    // Fetch shipping options from server
    axios
      .get(`${baseURL}/store/shipping-options/${cart_id}`)
      .then(({ data }) => {
        setShippingOptions(data.shipping_options);
        // Initializing payment session
        InitializePaymentSessions();
      });
  };
These functions handle retrieving payment and shipping options from Medusa. It also handles processing the payment through Stripe, and then handles the checkout in Medusa.
You can also replace the return function with the below code:
return (
<StripeProvider publishableKey={publishable_key}>
    <SafeAreaView style={styles.container}>
      <ScrollView>
        <Header title="Checkout" />
        <View style={styles.address}>
          <Text style={styles.title}>Shipping Address</Text>
          <ShippingAddress onChange={handleAddressInputChange} />
        </View>

        <View style={styles.payment}>
          <Text style={styles.title}>Payment</Text>
          <CardField
            postalCodeEnabled={false}
            placeholders={{
              number: "4242 4242 4242 4242",
            }}
            cardStyle={{
              backgroundColor: "#FFFFFF",
              textColor: "#000000",
            }}
            style={{
              width: "100%",
              height: 50,
              marginVertical: 30,
            }}
            onCardChange={(cardDetails) => {
              handlePaymentInputChange(cardDetails);
            }}
            onFocus={(focusedField) => {
              console.log("focusField", focusedField);
            }}
          />
        </View>
        <View style={styles.shipping}>
          <Text style={styles.title}>Shipping Options</Text>
          {shippingOptions.map((option) => (
            <View style={styles.shippingOption}>
              <RadioButton
                onPress={() => setSelectedShippingOption(option.id)}
                key={option.id}
                selected={selectedShippingOption === option.id}
                children={option.name}
              />
            </View>
          ))}

          <Button onPress={placeOrder} large title="Place Order" />
        </View>
      </ScrollView>
    </SafeAreaView>
</StripeProvider>
  );
Lastly, add the below style object at the end of the file:
const styles = StyleSheet.create({
  container: {
    flex: 1,
    backgroundColor: "#fff",
  },
  address: {
    marginHorizontal: widthToDp(5),
  },
  payment: {
    marginHorizontal: widthToDp(5),
    marginTop: heightToDp(4),
  },
  shipping: {
    marginHorizontal: widthToDp(5),
  },
  title: {
    fontSize: widthToDp(4.5),
  },
  shippingOption: {
    marginTop: heightToDp(2),
  },
});
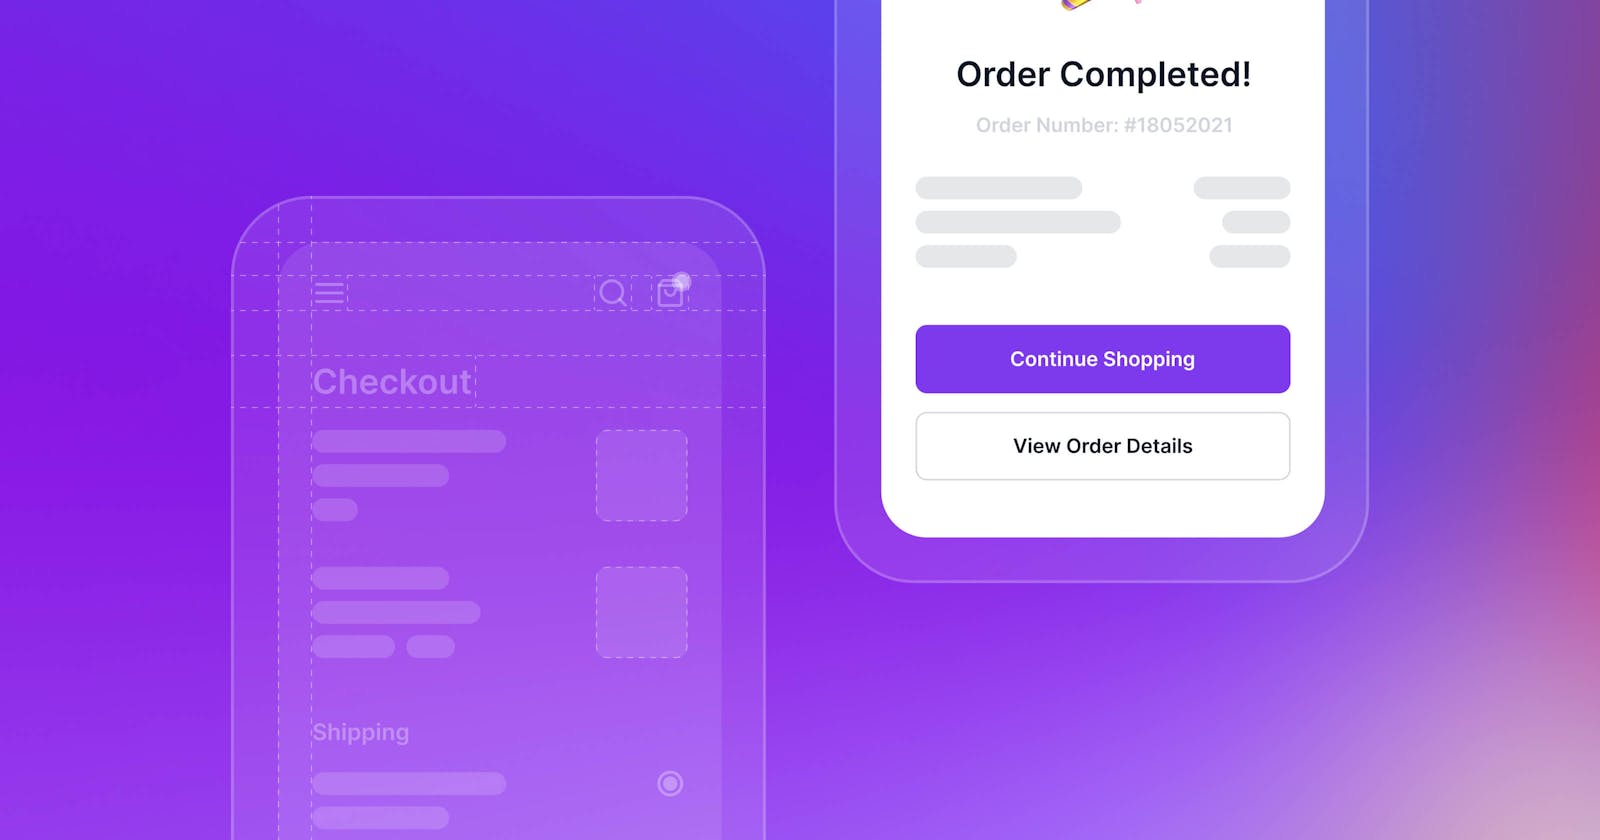
And that’s it! You should now be able to make payments and purchase items from the store.
Test Checkout Screen
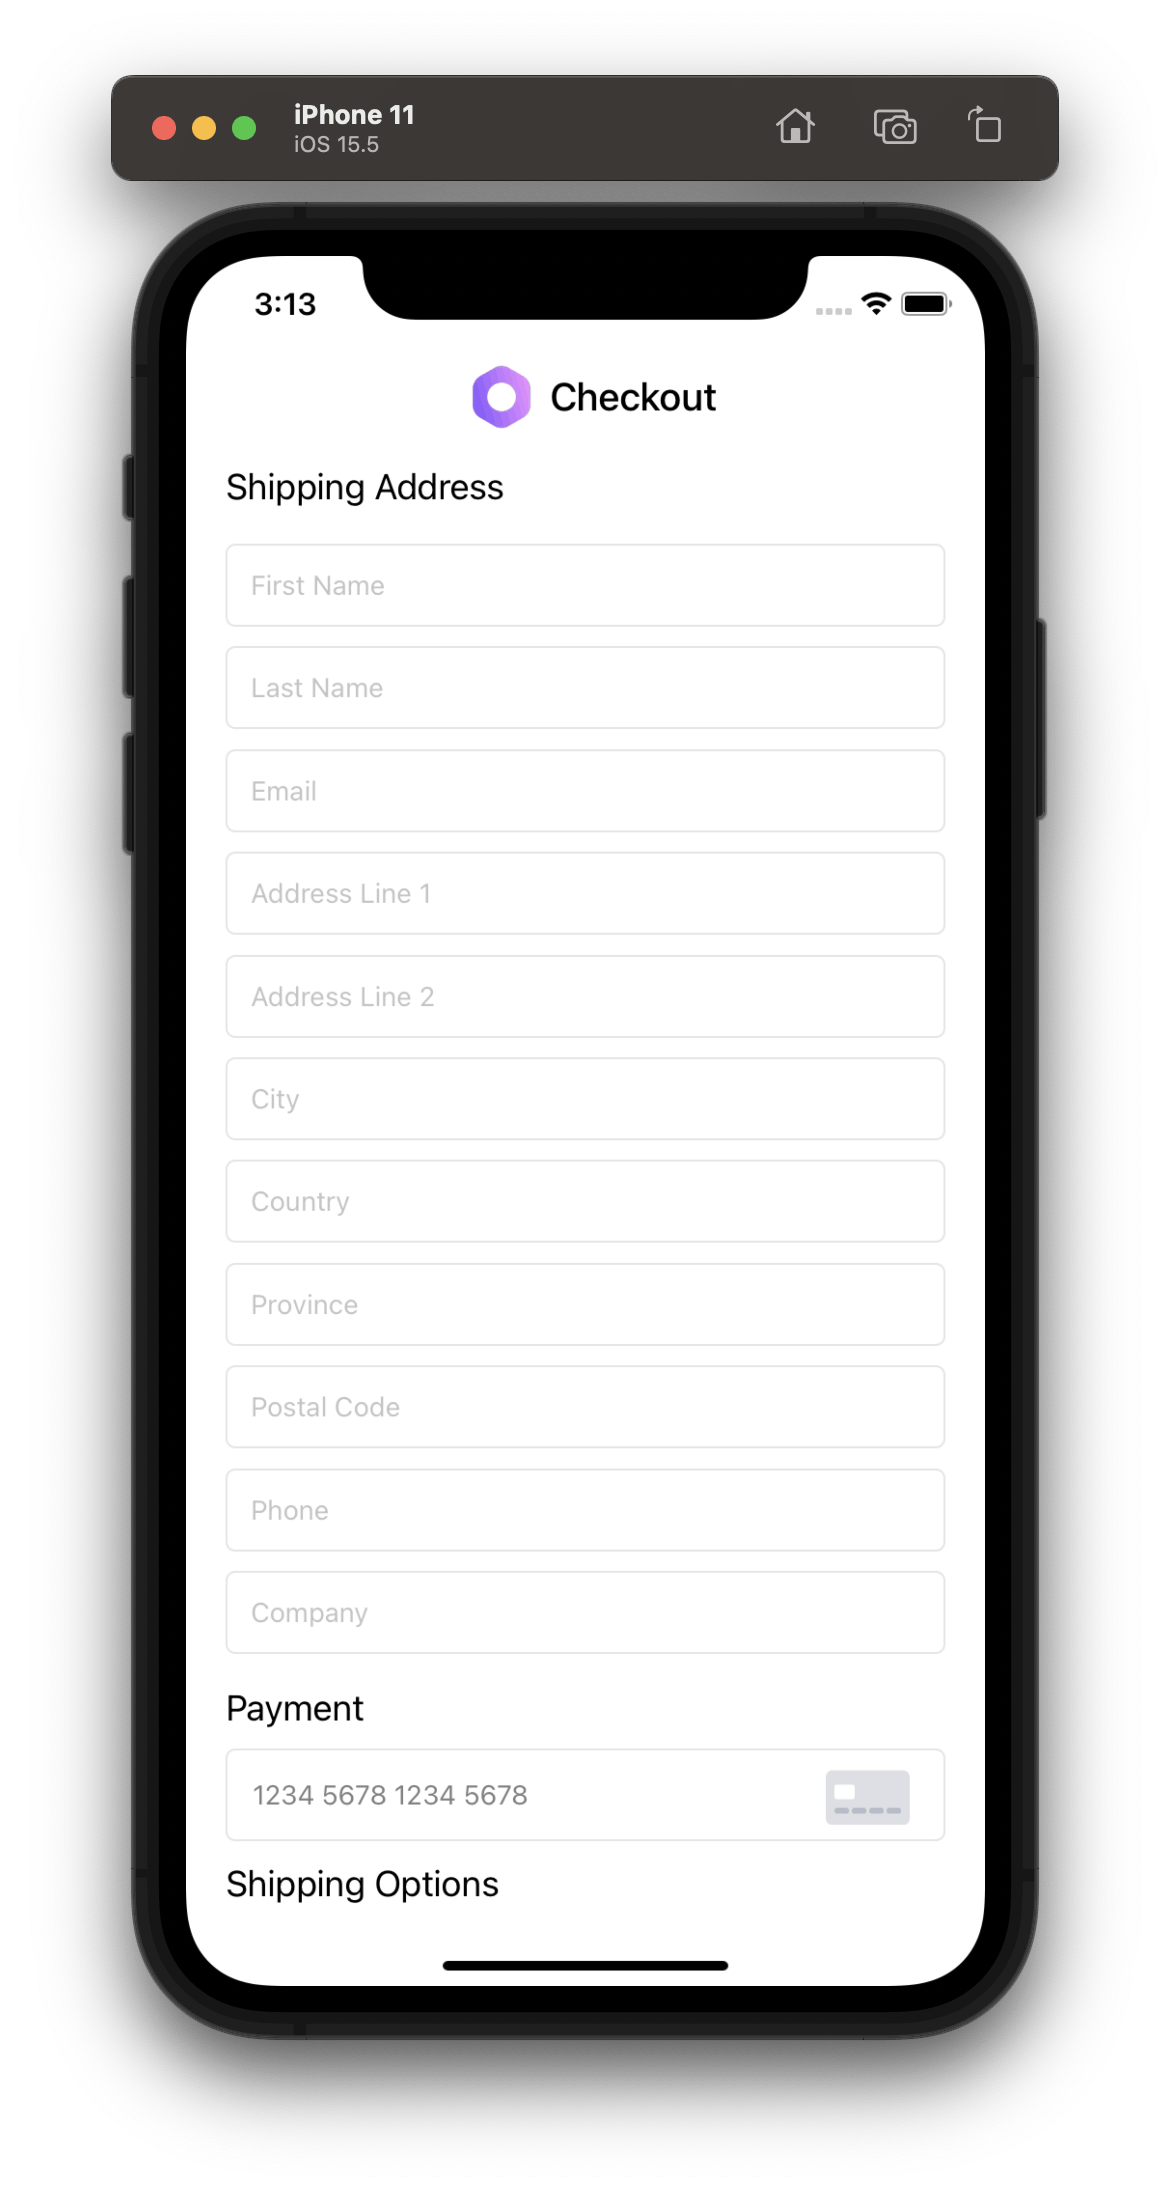
Now, try adding a few items to the cart and navigate to the checkout screen, you should be able to add an address and make payment. Here is what the checkout screen should look like:
What’s Next?
This article is part 2 of Creating an ecommerce app using Medusa and React Native. You can also add more functionalities using Medusa:
- Add a search engine using MeiliSearch.
- Check out the documentation for what more you can do with Medusa.
Should you have any issues or questions related to Medusa, feel free to reach out to the Medusa team via Discord.